A Developer's Guide to Test API Endpoints
To really test an API endpoint, you have to do more than just see if it’s “on.” You need to send it a variety of requests and then scrutinize the responses. Are you getting back the right status codes? Do the headers look correct? Is the data in the body exactly what you expect? This process is all about making sure the API behaves predictably, whether you're testing for functionality, security, or performance.
Why You Need a Bulletproof API Testing Strategy

In today's software, APIs are the glue holding everything together. They connect microservices, power frontend applications, and talk to third-party systems. A single broken endpoint can cause a massive ripple effect, leading to corrupted data, security holes, or even a full system meltdown. You can’t just hope for the best; you need a solid plan.
Without a rigorous testing process, you’re essentially flying blind. A seemingly small code change could introduce a nasty bug that tanks the user experience or, even worse, exposes sensitive information. A deliberate testing strategy, much like the key QA processes and checklists used in other quality assurance fields, acts as your first and most important line of defense.
The Real-World Impact of Poor API Testing
Failing to test your API endpoints properly isn't just a technical screw-up—it's a business problem. Just imagine a payment gateway API that sometimes drops transactions or an authentication endpoint that locks out paying customers. These kinds of glitches don't just create support tickets; they destroy user trust and tarnish your brand's reputation.
A solid strategy needs to hit several key areas:
- Functional Testing: This confirms each endpoint does what it's supposed to do. If you send a
POSTrequest, does it actually create a new record? Does aDELETErequest reliably remove it? - Performance Testing: Here, you're looking at how the API holds up under pressure. Can it handle a sudden spike of a thousand concurrent users without grinding to a halt?
- Security Testing: This is all about actively looking for weak spots. You're probing for vulnerabilities like injection attacks or ways to access data without permission, making sure your API is locked down tight.
Laying the Foundation for Reliable Software
At the end of the day, the goal is to build software that people can count on. Solid endpoint testing is a non-negotiable part of that, especially when you consider that over 89% of developers work with APIs every single day. When you're managing hundreds of endpoints, you have to be precise, tracking metrics like latency, response times, and status code distributions to keep everything healthy.
Proactively finding and squashing bugs before they ever see the light of day saves an incredible amount of time and money. More importantly, it helps you build a better, higher-quality product. A well-tested API is the bedrock of a stable application.
This guide will walk you through putting a strategy like this into practice using powerful tools like Postman and Newman. If you need a refresher on the fundamentals, you can get the essential background from our guide on what is API testing.
2. Getting Your Hands Dirty with Manual API Testing

Automation is the end goal, but you can't automate what you don't understand. Before you ever write a single test script, the best way to really get a feel for an API is to poke at it directly.
Manual testing is your first conversation with an endpoint. It's how you discover its quirks, learn what kind of data it expects, and see how it reacts when things go wrong. This hands-on exploration is where you build the foundational knowledge for writing solid, effective automated tests down the line.
Probing Endpoints with Curl
The most direct, no-frills way to talk to an API is with a command-line tool like curl. It's lightweight, available on just about every system, and it forces you to think about the raw ingredients of an HTTP request: the method, the URL, the headers, and the body. You construct everything yourself, giving you an unfiltered look at the API's contract.
Let's say you're working with a simple to-do list API. A GET request to pull all tasks is a one-liner. You just give curl the URL, and it spits the raw JSON response right back into your terminal. Easy.
But what about creating a new task? That’s where curl shows its true colors. You’ll need a POST request. This involves explicitly setting the method with -X POST, telling the server you're sending JSON with a Content-Type header, and passing the new task's data as a JSON payload using the -d flag.
Updating an existing task would follow a similar pattern, just using -X PUT and including the task's ID in the URL. Deleting it is as simple as sending a -X DELETE request to that specific resource.
A Visual Approach with Postman
While curl is incredibly powerful, it can feel a bit raw, especially when you're wrestling with complex JSON bodies or managing authentication tokens. For a more visual and forgiving experience, most developers I know lean on a GUI tool like Postman.
Postman gives you a clean, organized interface that hides the command-line mess. Instead of typing out long commands, you just pick your HTTP method from a dropdown, plug in the URL, and manage headers and body content in their own tidy tabs. This makes it ridiculously easy to test API endpoints without getting tripped up by syntax.
When you send a request, Postman doesn't just dump the raw response on you. It automatically pretty-prints the JSON, making it a breeze to read and inspect. You can instantly see status codes, check response times, and review header values in a structured format.
I almost always start my workflow in Postman. It's my go-to for exploring new endpoints, figuring out the exact structure of a request body, and nailing down the authentication flow. Once I have a working request, translating that logic into an automated test or a
curlcommand is simple.
Authentication is another area where Postman shines. Whether you're dealing with a Bearer Token, an API Key, or OAuth 2.0, Postman has built-in helpers that handle the heavy lifting. You can also save your requests into "Collections," creating an organized library of API calls that you can reuse and share with your team. This initial manual exploration is an absolutely invaluable step for understanding an API's behavior from the ground up.
Curl vs Postman for Manual Testing
So, when should you reach for the command line, and when is a GUI the better choice? Both have their place in a developer's toolkit. Here’s a quick breakdown to help you decide.
| Feature | Curl | Postman |
|---|---|---|
| Use Case | Quick, simple requests; scripting; environments without a GUI. | Complex requests; exploring new APIs; collaboration; managing environments. |
| Interface | Command-line only. | User-friendly graphical interface (GUI). |
| Learning Curve | Steeper for beginners, requires memorizing flags and syntax. | Very low, intuitive for anyone familiar with web concepts. |
| Request Management | No built-in history or organization; you rely on shell history. | Saves requests in organized "Collections" that can be shared with a team. |
| Authentication | Handled manually with headers (e.g., -H "Authorization: Bearer..."). |
Built-in helpers for OAuth, API Keys, Bearer Tokens, and more. |
| Response Handling | Dumps raw text to the terminal. | Pretty-prints JSON/XML, shows headers, status codes, and timing clearly. |
| Automation | Excellent for scripting and embedding in shell scripts or CI/CD. | Has its own test scripting and automation runner (Newman). |
Ultimately, curl is perfect for quick checks and automation scripts where you know exactly what you need to do. Postman excels during the discovery phase, when you're learning an API and need a more interactive, visual way to build and manage your requests. Many developers, myself included, use both regularly depending on the task at hand.
Building Your First Automated API Test Suite
Manual testing is great for poking around and getting a feel for an API. But if you’re relying on it for the long haul, you're setting yourself up for a world of pain. It's slow, prone to human error, and simply doesn't scale. To get real speed, consistency, and confidence, you need to automate. This is where we graduate from sending one-off requests to building a proper, self-verifying test suite in a tool like Postman.
The first step in this journey is organizing your requests into a Postman Collection. Just think of a Collection as a folder for grouping related API calls—like all the endpoints for managing user profiles. This structure is the backbone of your automation, letting you run a series of tests in a specific order to mimic a real-world workflow.
This diagram gives a great high-level view of how to structure your whole testing process.
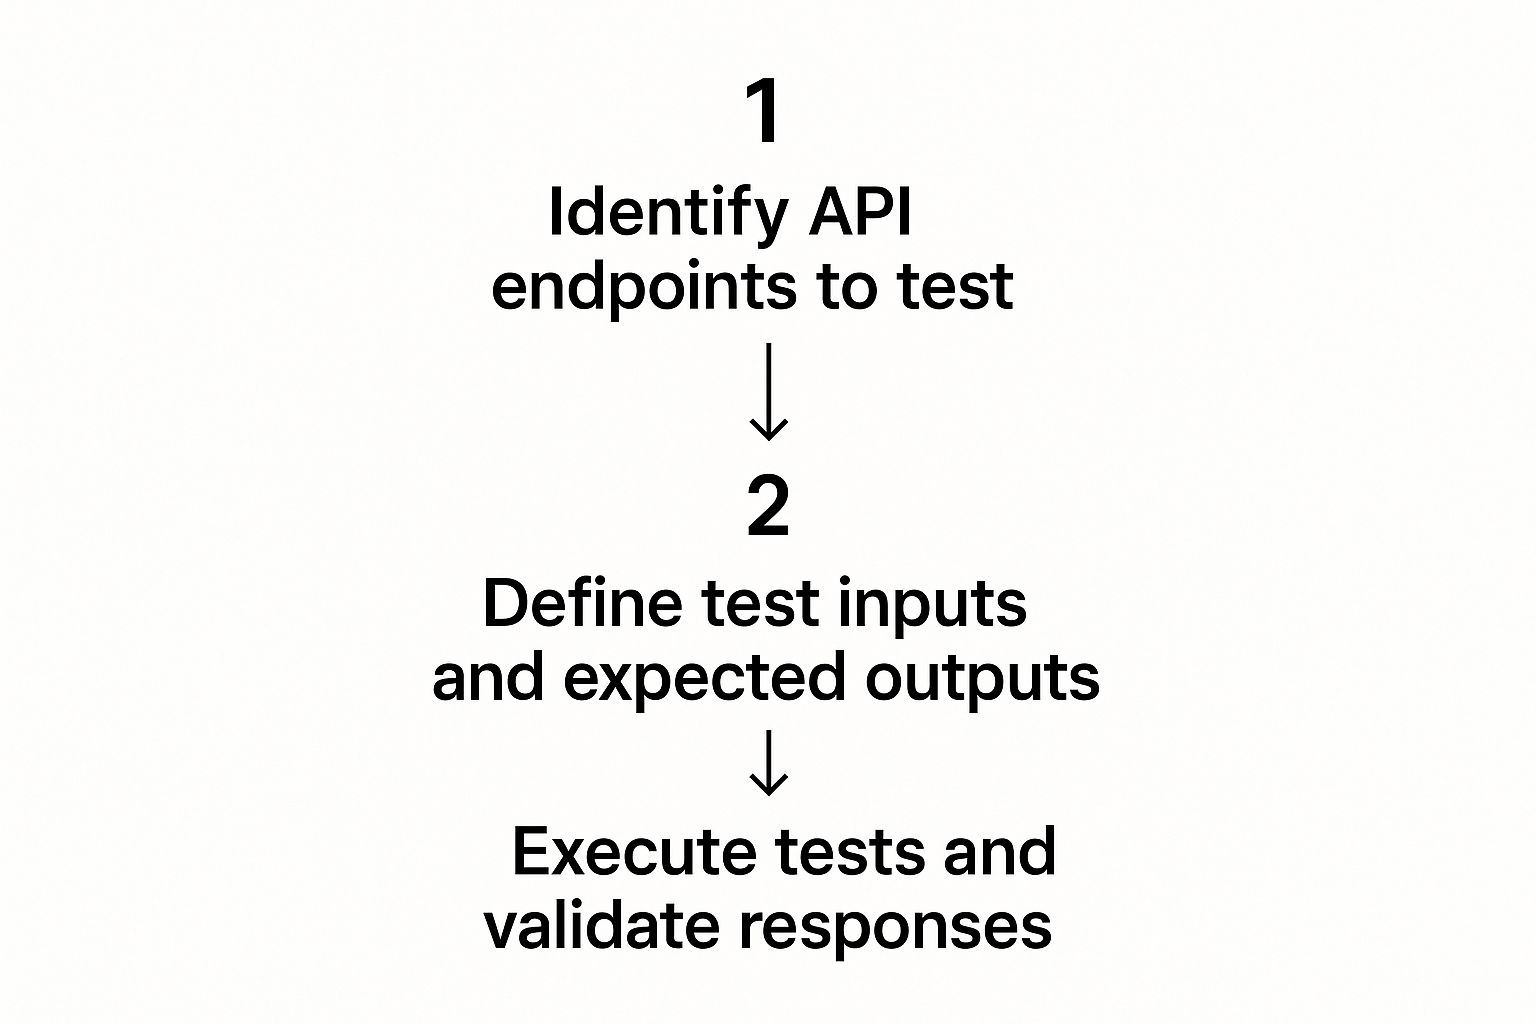
This cycle—from identifying endpoints to validating their responses—is what turns random checks into a systematic way to test API endpoints.
Writing Meaningful Assertions
Here’s the thing about automated API testing: it’s not just about sending requests. The real magic happens when you programmatically verify the responses. In Postman, the "Tests" tab is your best friend. This is where you write JavaScript assertions that run the moment a response comes back, essentially encoding your expectations into code.
And please, go beyond just checking for a 200 OK. It’s a start, but it doesn't tell you if the data you got back is actually correct. A truly useful test suite dives much deeper.
- Validate the Response Body: Is the right data there? Check that a user object in the JSON response actually has an
idand anemailfield. - Check Header Content: Are your security headers present? Make sure headers like
Content-Security-Policyare there or that theContent-Typeis exactlyapplication/json. - Measure Response Time: You can even write a test that fails if the API takes more than, say, 500ms to respond. This is a brilliant way to catch performance issues before they hit production.
Let's look at a real-world example. Say you just fetched a user profile. Your test script might look something like this:
pm.test("Status code is 200", function () {
pm.response.to.have.status(200);
});
pm.test("Response includes user data", function () {
const responseJson = pm.response.json();
pm.expect(responseJson).to.have.property('id');
pm.expect(responseJson.email).to.include('@');
});
This little script is doing some heavy lifting. It confirms the request worked, checks that the response is valid JSON, and makes sure key data points are both present and formatted correctly. It does all of this in milliseconds. If you want to see more examples like this, our detailed guide on how to test REST APIs is a great resource.
Managing Different Environments
Hardcoding URLs and API keys directly into your requests is a classic rookie mistake. The credentials that work on your local machine are not going to work in staging or production. This is exactly what Postman's Environment Variables were made for.
Environments allow you to tuck away variables like baseURL, apiKey, and authToken separately from your actual requests. You can set up different environments—"Local," "Staging," "Production"—and switch between them with a simple dropdown.
By using environment variables, you can run the exact same test suite against multiple deployment stages without changing a single line of code in your tests. This practice is fundamental for creating portable and maintainable automation.
So, instead of a request to http://localhost:3000/users, you’d use {{baseURL}}/users. Postman automatically swaps in the baseURL value from whichever environment you have active. This keeps your test logic clean and completely separate from deployment details, making your test suite incredibly adaptable.
Weaving API Tests into Your CI/CD Pipeline
Writing automated tests is one thing, but making them an integral part of your development process is where the real magic happens. By plugging your API test suite into a Continuous Integration/Continuous Deployment (CI/CD) pipeline, you create an automated safety net. It’s no longer a chore you have to remember to do; it's a guardrail that protects every single code change.
The whole point is to catch bugs the second they’re created, long before they have a chance to sneak into production. When your tests run on every push or merge request, you get that instant feedback loop. Did a change break an important endpoint? The build fails, the developer gets an immediate notification, and the problem is fixed right away. This is how you prevent regressions and keep your API solid with every commit.
This approach is often called "shift-left testing," which just means we're moving the testing process earlier in the development cycle. It’s a massive trend in API testing, with tools becoming more and more integrated into CI/CD workflows to give developers that rapid, automated feedback. If you're curious, there's a lot to read about emerging trends in API testing and how they're shaping the future.
Taking Postman Tests to the Command Line with Newman
So, how do you actually run your Postman Collections from a CI/CD pipeline? You'll need a command-line tool, and Newman is Postman's official solution for this. It’s built to run any Postman Collection right from your terminal or, more importantly, from a pipeline script.
The workflow is pretty straightforward:
- First, you export your Postman Collection and any environment variables you use as JSON files. Then, you commit these files to your Git repository so they live alongside your code.
- Next, in your CI/CD configuration file, you’ll add a step to install Newman. A simple
npm install -g newmanusually does the trick. - Finally, you add the command to actually run Newman, telling it where to find your collection and environment files.
This simple setup is incredibly flexible and works with just about any CI/CD platform out there, whether you’re using GitHub Actions, Jenkins, or GitLab CI.
A Practical Example: GitHub Actions
Let's walk through what this looks like in the real world with a GitHub Actions workflow. Say you want to run your API tests every time code is pushed to the main branch. You’d set up a workflow file, maybe at .github/workflows/api-tests.yml, with something like this:
name: API Endpoint Tests
on:
push:
branches: [ main ]
jobs:
test-api:
runs-on: ubuntu-latest
steps:
- name: Check out repository code
uses: actions/checkout@v3
  - name: Install Node.js
    uses: actions/setup-node@v3
    with:
      node-version: '18'

  - name: Install Newman
    run: npm install -g newman

  - name: Run API tests
    run: |
      newman run "My API Collection.json" \
      --environment "Staging Environment.json" \
      --env-var "apiKey=${{ secrets.API_KEY }}"
The key takeaway here is the final
runstep. It executes Newman with your collection and environment files. Notice the--env-varflag? That’s how we securely pass in a sensitive API key using GitHub's encrypted secrets.
If even a single test in that collection fails, Newman will exit with an error. This automatically fails the GitHub Actions job, effectively blocking a bad deployment before it can cause any trouble. It’s a simple, powerful way to enforce quality.
Using Mock Servers for Faster, Independent Testing

What happens when the API your application depends on is down, unstable, or maybe hasn't even been built yet? You could just wait, grinding your own development to a halt. Or, you could use a mock server to keep things moving. This is a game-changing strategy for creating reliable, independent tests without being at the mercy of a live backend.
Think of API mocking as having a stunt double for your real API. It stands in and gives your application the predictable responses it needs to function, allowing you to test your code in total isolation. This is incredibly valuable for frontend developers building a UI before the backend is finished, or for QA engineers who need to simulate very specific scenarios on demand.
Simulating Real-World Scenarios
A good mock server gives you complete control over the API's behavior. Instead of crossing your fingers and hoping a live server throws a 500 error, you can just tell your mock server to do it. This makes it almost trivial to test API endpoints under all sorts of conditions.
With a tool like dotMock, you can spin up custom responses for any endpoint in seconds. You can easily configure it to return:
- A successful
200 OKwith a specific JSON payload you've defined. - A classic
404 Not Founderror to check your application’s error handling. - The dreaded
500 Internal Server Errorto see how your UI holds up when the backend fails. - A delayed response to simulate what happens on a slow network connection.
This level of control is absolutely crucial for building resilient software that doesn't just fall apart when its dependencies act unpredictably.
Mocking isn’t just about pretending an API exists; it’s about precisely controlling its behavior. This allows you to test edge cases and failure modes that are nearly impossible to reproduce consistently with a live, production API.
The Benefits of Decoupled Testing
By cutting the cord to a live API, you gain incredible speed and stability. Your entire test suite can run anytime, anywhere, without you having to worry if the staging environment is down or if a third-party service is having an outage.
This approach also sidesteps annoying issues like hitting rate limits on external APIs during development and testing, which can be both costly and disruptive. Ultimately, using a mock server means your tests are faster, more reliable, and focused solely on validating your application's logic. It’s a simple change that can dramatically improve your entire development workflow and the quality of the final product.
Finding Security Flaws Before They Find You
Functional and performance tests are essential, but they won't flag a vulnerability that lets an attacker stroll out the front door with your entire user database. When you test API endpoints, you have to start thinking with a security-first mindset. This doesn't mean becoming a penetration tester overnight. It just means weaving simple, high-impact security checks right into the testing you're already doing.
Security testing really begins by challenging the API's assumptions. What happens if a logged-in user tries to peek at data that doesn't belong to them? That one simple question gets to the heart of one of the most common—and dangerous—API vulnerabilities out there.
Probing for Authorization Flaws
The most common vulnerability we see time and again is Broken Object Level Authorization (BOLA). This is where an API simply doesn't check if a user is actually allowed to access a specific piece of data they've requested. Recent research highlights a huge gap here, showing that only about 10% of organizations have a solid API security strategy, leaving countless endpoints exposed. You can get more insights on this API threat landscape and read the full research from CybelAngel.
Here’s a practical way to check for BOLA using a tool like Postman:
- First, authenticate as User A to get a valid session token.
- Then, request a resource that belongs to User A, something like
/orders/123. Confirm you get the expected data. - Now for the real test: change the ID in the request to one owned by a different user, let's say
/orders/456, but keep using User A's original token.
If the API hands over the data for order 456, you’ve just found a critical BOLA vulnerability. A well-secured API should immediately shut this down with a 403 Forbidden or even a 404 Not Found status code. For a much deeper dive into this and other checks, our detailed guide provides more context on the security testing of APIs.
Other Essential Security Checks
Beyond just authorization, a few other quick checks can uncover some pretty serious security weaknesses. Making these a part of your standard testing routine will help you build a much stronger defense against common attacks.
Think like an attacker. Your goal is to push the API to behave in ways the developers never intended. Every unexpected response is a breadcrumb that could lead to a vulnerability.
Always keep these common slip-ups in mind:
- Excessive Data Exposure: When you hit your
/users/{id}endpoint, does it return everything—including password hashes, internal notes, or other sensitive details? Your tests should explicitly assert that only necessary, public-facing data comes back in the response. - Information Leaks in Errors: Go ahead and trigger a
500 Internal Server Erroron purpose. If that response body contains a full stack trace, database connection strings, or internal file paths, you've got a major information leak. It's like handing an attacker a roadmap to your system. Your tests need to verify that all you get back are generic, unhelpful error messages.
Common Questions I Hear About API Testing
When you're deep in the weeds of API development, it's easy to get tangled up in the terminology and different testing approaches. Let's clear up a few of the most common questions I get asked by developers and testers.
API Testing vs. Unit Testing: What's the Real Difference?
I like to think of it in terms of scope. The main distinction boils down to what you're actually examining.
Unit testing is all about isolation. You're putting a single function or method under a microscope to make sure it does its one specific job correctly, completely separate from the rest of the application. Think of it as checking a single spark plug in an engine.
API testing, on the other hand, is a type of integration testing. It's not just about one piece of code; it's about the entire journey. You're sending a real request to an endpoint and checking that the whole system—from the business logic to the database and any other services it talks to—works together to produce the right response. You're making sure the whole engine runs.
How Should I Approach API Performance Testing?
When you need to know how your API holds up under pressure, you're entering the world of performance and load testing. This isn't about whether a feature works, but rather how well it works when things get busy. It's all about speed and stability.
To do this right, you'll need tools designed for the job, like k6 or JMeter. These let you simulate a flood of traffic—think hundreds or thousands of concurrent users—all hitting your API at once.
The goals here are pretty specific:
- Pinpoint how long your API takes to respond when it's under heavy strain.
- Discover its breaking point—that critical threshold where performance degrades and errors start climbing.
- Dig into resource usage (CPU, memory) to find those sneaky bottlenecks that are slowing things down.
Ultimately, this kind of testing gives you the confidence that your API won't buckle during a traffic spike.
One of the biggest mistakes I see teams make is only testing the "happy path." The real gold is often found when you simulate what happens when things go wrong. A mock server is your best friend here, letting you reliably trigger specific error states, like a
503 Service Unavailable, that are nearly impossible to reproduce on demand with a live system.
When Does it Make Sense to Use a Mock Server?
A mock server is an indispensable tool in a few key situations. You should absolutely reach for one whenever the real, live API is unavailable, unreliable, or just plain expensive to hit repeatedly (like a third-party service with usage-based pricing).
It's also a game-changer for team velocity. Mocks allow frontend and backend teams to work at the same time. The frontend devs can build against a stable, predictable mock API without having to wait for the backend to be fully built and deployed. It completely decouples your workflows.
Ready to build faster and test smarter without waiting on live APIs? With dotMock, you can create production-ready mock APIs in seconds. Simulate any scenario, from success to failure, and accelerate your development cycle. Get started today with dotMock.