How to Test REST APIs An Actionable Guide
When you're testing a REST API, you're essentially sending a series of requests to different endpoints and then carefully checking if the responses match what you expect. It’s more than just a simple check; you’re validating everything from HTTP status codes and the data in the response body to how the API handles errors. This whole process is designed to make sure the API is functional, fast, and secure under all sorts of conditions.
Building a Foundation for Effective API Testing
Before you jump into writing test scripts, you have to get a handle on what you're actually testing. Think of REST APIs as the backbone of almost every modern application. They're the communication lines that let a mobile app or website talk to the server to fetch data, submit information, or trigger important actions.
Getting good at REST API testing really starts with building a solid mental model of how they operate. This isn't about memorizing jargon from a textbook; it's about deeply understanding the core pieces you'll work with every day. Having this foundation is your single best tool for hunting down bugs and building software that people can rely on.
Key Concepts for API Testers
To get your bearings, let's zero in on three fundamental areas. Pretty much every API test you'll ever write will touch on these:
HTTP Methods: These are the "verbs" of the API world. You'll constantly use
GETto retrieve data,POSTto create something new,PUTorPATCHto make updates, andDELETEto get rid of it. The very first step in crafting a good test is knowing which method an endpoint is designed to accept.Status Codes: These three-digit codes are the API's way of quickly telling you how a request went. A
200 OKis the classic sign of success, while a404 Not Foundmeans the resource you asked for isn't there. Other codes, like401 Unauthorizedor500 Internal Server Error, give you immediate clues about what might have gone wrong.Request and Response Bodies: Data is almost always sent back and forth in a structured format, and today, that's usually JSON. You'll need to get comfortable reading and parsing JSON to confirm that the data coming back in a response is accurate, complete, and in the right format.
To help you get familiar with these concepts, here's a quick reference guide to the most common HTTP methods you'll encounter.
Essential HTTP Methods and Their Purpose in Testing
A quick reference guide to the most common HTTP verbs used in REST API testing and what action they typically represent.
| HTTP Method | Action | Common Test Scenario |
|---|---|---|
| GET | Retrieve Data | Verify that fetching a user by their ID returns the correct user details and a 200 OK status. |
| POST | Create Data | Send a request to create a new product and check that the response contains the new product's ID and a 201 Created status. |
| PUT | Update/Replace Data | Update a user's entire profile and confirm that all fields were replaced correctly. |
| PATCH | Partially Update Data | Change only a user's email address and verify that no other profile information was altered. |
| DELETE | Remove Data | Delete an item from a shopping cart and then make a GET request to ensure it's truly gone. |
Understanding these methods is your starting point for designing tests that cover the full lifecycle of your data.
The goal of API testing isn't just to see if an endpoint works. It's to confirm it works correctly, fails gracefully, and performs efficiently under both ideal and stressful conditions. This comprehensive approach prevents bugs from reaching end-users.
This intense focus on API reliability is quickly becoming the norm. Recent industry reports show that over 78% of development teams now have dedicated API testing in their workflow, which is a massive leap from just 55% five years ago. This shift is a direct result of the move toward complex microservice architectures and the need to integrate with countless third-party services.
Ultimately, a strong testing strategy is built on creating predictable, repeatable environments. This often means isolating your API from flaky external dependencies, a technique you can dive into with our guide on what service virtualization is and why it matters. When you control the testing landscape, you build the confidence you need to ship truly resilient applications.
Choosing Your API Testing Toolkit
Picking the right tool for API testing is one of those decisions that can really shape your team's workflow and how quickly you can ship reliable code. It’s less about finding the one "best" tool on the market and more about finding the one that fits your specific needs right now.
The whole decision really boils down to a trade-off: do you need the simplicity of a user interface for quick, manual checks, or the raw power of code for deep automation? Let's break that down.

GUI Clients: Your Go-To for Manual and Exploratory Testing
When you're just getting started or need to quickly poke around an API, nothing beats a good GUI client. Tools like Postman and Insomnia are fantastic for this. Their graphical interfaces let you build HTTP requests, tweak headers, and view responses without touching a single line of code.
This is my go-to approach when I’m exploring a new endpoint for the first time or just need to verify a specific behavior without the overhead of writing a full test script.
But don't mistake them for simple request builders. You can do some pretty sophisticated stuff, like organizing requests into collections, setting up environments for different servers (think dev vs. prod), and even writing basic JavaScript assertions to validate responses.
The market for these tools is packed. Postman alone has millions of users who rely on its mix of an easy-to-use GUI and powerful scripting. If you're curious about the other options out there, this list of the 15 best REST API clients and testing tools for 2025 gives a great overview of the landscape.
My Advice: Start with a GUI client. It gives you instant feedback and is perfect for manual testing. Get comfortable with its features for organizing your work and writing simple checks before you even think about jumping into more complex automation.
Code-Based Libraries: The Powerhouse for True Automation
GUI tools are fantastic, but you'll eventually hit a wall when you need to build a serious, automated testing suite. That’s where code-based libraries come in. They give you complete control and allow you to integrate your API tests right into your development pipeline.
The best part is that there’s a great library for almost any tech stack your team is using.
- Java Shops: If your team lives and breathes Java, REST Assured is hands-down the top choice. Its BDD-style syntax makes the tests incredibly readable.
- Python Devs: The simplicity and elegance of the Requests library make it a perennial favorite for any API interaction.
- JavaScript Ecosystem: In the JS world, you'll typically use libraries like Axios or the built-in Fetch API inside a testing framework like Jest or Mocha to create really powerful test suites.
The real win here is that you can manage your tests in Git, right alongside your application code. This is a game-changer for team collaboration and is absolutely essential for plugging your tests into a CI/CD pipeline. Sure, the learning curve is a bit steeper, but the payoff in scalability and power is huge. The smartest move is to pick a library that aligns with your team's existing programming skills—it's always the most efficient way forward.
Getting Your Hands Dirty: Writing Your First API Tests
All the theory in the world can't replace the experience of actually doing the work. So, let's roll up our sleeves and move from concepts to a real, hands-on walkthrough. We’ll use a common tool like Postman to build that muscle memory you need for solid API testing.
The first step is always the simplest: send a request and see what you get back. We need a target for this, and a fantastic public resource for learning is the JSONPlaceholder API. It’s designed to provide fake data, which is perfect for practice.
Let’s start by sending a GET request to one of its endpoints, like /posts/1. Fire it off and take a look at the response.
You'll get a few key pieces of information: the status code (which should be 200 OK), the response headers, and the JSON body with all the post data. This initial manual check is the seed from which all testing grows, but it's not something you can do at scale. The real magic happens when you teach your tools what to look for automatically.
Crafting Your First Assertions
This is where you turn your expectations into code. These automated checks are often called assertions, and they’re what separate a one-off API call from a repeatable, reliable test. Instead of you having to check the status code every single time, you can write a tiny script to do it for you. In Postman, you can do this with just a few lines of JavaScript right in the "Tests" tab.
Your first set of assertions should always cover the non-negotiables:
- Status Code Verification: The most basic check. Did we get a
200 OKfor a successful request? - Response Time Check: Is the API responding quickly enough? Let's say, under 500ms. Performance is a critical feature, not an afterthought.
- Content-Type Validation: Did the
Content-Typeheader come back asapplication/jsonlike we expected?
Getting these three things right establishes a powerful baseline. If any of them fail, you know something is fundamentally broken without even needing to look at the data itself.
A good API test doesn't just check for success; it defines what success looks like in concrete terms. Verifying status, speed, and structure turns a simple API call into a reliable quality gate.
Once those foundational checks are solid, you can start digging into the data. For instance, you could write an assertion to verify that the userId field in the response is a number, or that the title field is a string and isn't empty. Every assertion you add makes your test smarter and more robust, catching a wider net of potential bugs.
Managing Environments for Repeatable Tests
I’ve seen this mistake a thousand times: developers hardcoding URLs and authentication tokens directly into their requests. It feels fast at first, but it’s a recipe for a maintenance nightmare. What do you do when you need to run the same tests against the staging server instead of your local machine?
This is where environment variables become your best friend.
Instead of typing out http://localhost:3000/api/posts, you use a variable like {{baseURL}}/posts. Then, you can set up different environments—like Local, Staging, and Production—and just define what {{baseURL}} means in each one. This lets you retarget your entire test suite to a new server with a single dropdown selection.
This practice is absolutely critical for creating a professional testing setup that can grow with your project. You should always use variables for:
- Base URLs: The root URL for your API in each environment.
- Authentication Tokens: Never, ever hardcode secrets. Store them in variables.
- User IDs or Resource Identifiers: For testing specific items without having to edit the test logic itself.
By starting simple, writing clear assertions, and using environments, you build a testing foundation that’s not just effective today, but also scalable and easy to manage down the road.
Testing for Real-World Scenarios and Edge Cases
An API that only works under perfect conditions is a liability. Once you’ve confirmed everything runs smoothly on the "happy path," the real work begins. It's time to make sure your API is resilient, secure, and user-friendly when things inevitably go sideways. This is where we move into testing for the messy reality of a live production environment.
What does that look like in practice? It means intentionally throwing curveballs at your API. Think malformed requests, expired authentication tokens, or incomplete data payloads. The goal isn't just to see if it breaks; it's to confirm that it fails gracefully. A well-designed API should always return a clear, helpful error message without ever leaking sensitive internal information.

Simulating Unpredictable Dependencies
Your API doesn't live in a bubble. It's constantly interacting with databases, third-party services, and other internal microservices. Any one of these dependencies can become slow, unresponsive, or fail entirely. How does your API react when its database connection times out? You can't just unplug your production database to find out.
This is exactly where API mocking becomes essential. Using a tool like dotMock, you can create a virtual stand-in for any dependency, giving you complete control over its behavior.
You can configure your mock service to simulate all sorts of common failure modes:
- HTTP 500 Errors: Make the mock throw a server error to see if your API's retry logic or fallback mechanisms actually work.
- Response Delays: Intentionally add a delay to mimic a slow network or an overloaded downstream service.
- Rate Limiting: Simulate a
429 Too Many Requestsresponse to verify your API handles rate limits correctly.
This approach lets you isolate the specific component you're testing. You get to build a genuinely robust system without affecting a single live service.
The most resilient APIs are those that have been deliberately pushed to their breaking point in a controlled environment. Mocking dependencies is the safest and most effective way to discover and fix these breaking points before your users do.
By simulating these real-world failures, you're not just testing lines of code; you're building confidence that your application can withstand the chaos of a live environment. You can dig deeper into setting up these scenarios by learning more about crafting dynamic response rules for your mock APIs.
This shift in focus—from just verifying success to validating graceful failure—is what separates basic API checks from a professional quality assurance process. It’s how you ensure your API isn't just functional, but truly reliable.
Bringing Your API Tests into the CI/CD Pipeline
Running your test suites by hand is a decent starting point, but let's be honest—it's a bottleneck. It slows you down. The real magic happens when you automate the whole process by integrating your tests directly into a Continuous Integration/Continuous Deployment (CI/CD) pipeline. This turns testing from a periodic chore into an always-on safety net for your application.
The end goal is a simple, powerful workflow: your API tests run automatically every single time a developer commits new code. This provides almost instant feedback, catching bugs within minutes of being introduced, not weeks later during a manual QA cycle. That rapid feedback loop is what gives your team the confidence to merge and deploy changes much faster and more frequently.
At its core, every automated API test run follows this fundamental, three-step process.
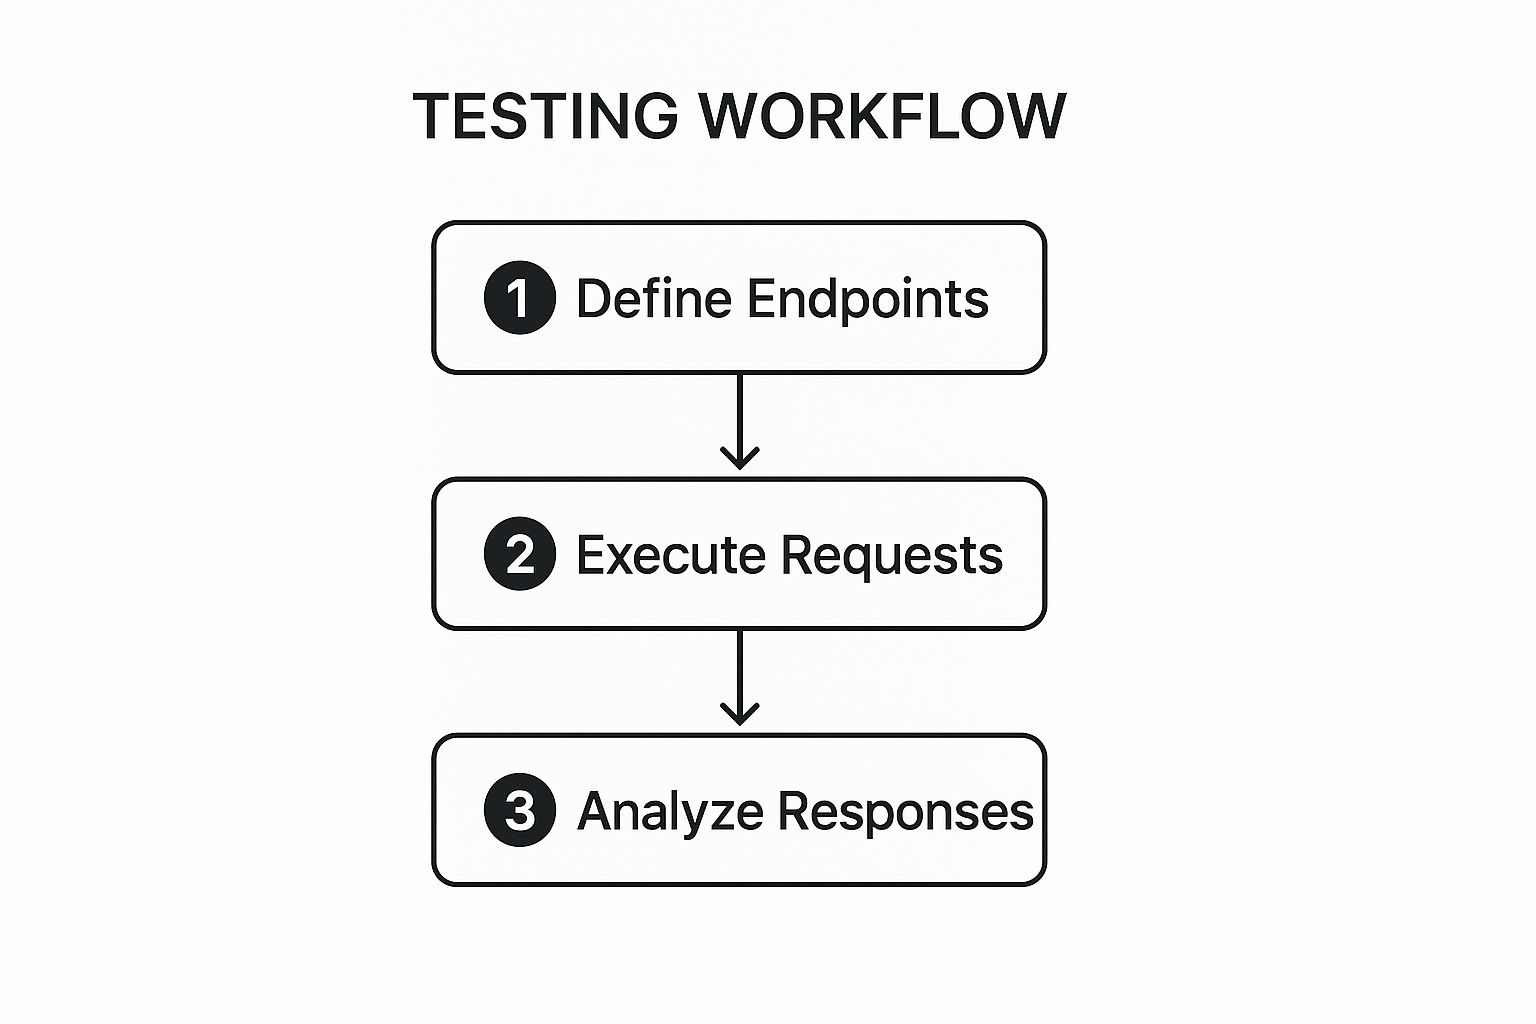
From defining the endpoints to executing requests and analyzing the responses, your CI/CD pipeline is built to handle each stage seamlessly without any manual intervention.
Getting Your Tests Pipeline-Ready
Before you can fire off tests automatically, they need to be runnable from a command line. If you've been working in a GUI-based tool like Postman, this is where a companion tool like Newman becomes your best friend. Newman is a command-line collection runner for Postman that lets you execute any test collection without ever opening the app itself.
It's a pretty straightforward process. You just export your Postman collection and environment as JSON files, then run a simple command in your terminal:
newman run my_api_tests.json -e production.postman_environment.json
This single command kicks off all the requests and assertions you’ve defined in your collection, running them against the environment you specified. If even one test fails, Newman exits with a non-zero status code. That exit code is the critical signal your CI/CD platform uses to stop the build and flag a failure.
Plugging into GitHub Actions or Jenkins
Once your tests can be triggered from the command line, integrating them is surprisingly simple. In a platform like GitHub Actions or Jenkins, you just add a new step to your build process. This step will execute the Newman command right after your application has been built and deployed to a staging environment.
Here’s what that flow generally looks like in a CI pipeline:
- Code Commit: A developer pushes new code to the repository.
- Build & Deploy: The CI server springs into action, building the app and deploying it to a temporary test environment.
- Run API Tests: The server then executes your Newman script against that newly deployed environment.
- Report Results: If every test passes, the pipeline continues to the next stage (like merging to the main branch). If anything fails, the build is marked as broken, and the team gets notified immediately.
By baking API tests right into your pipeline, you ensure that no code change—no matter how small—can break your API's contract without you knowing about it. This is how you build truly reliable software that can scale.
This isn't just a "nice-to-have" anymore; it's quickly becoming standard practice. It's predicted that by 2025, more and more teams will have API testing fully integrated into their CI/CD pipelines, making automated execution on every commit the norm and drastically cutting down on regression defects. This kind of automation also opens the door to other advanced practices, which is why you might want to learn more about contract testing to get ahead of integration issues between services.
Frequently Asked Questions About REST API Testing
https://www.youtube.com/embed/oXW-C2bM0wE
As you start getting your hands dirty with REST API testing, you'll inevitably run into a few common questions and roadblocks. It happens to everyone. Let's walk through some of the most frequent hurdles I see testers encounter and clear up any confusion.
What Is the Difference Between API Testing and UI Testing?
This is probably the most fundamental question people ask. It's easy to blur the lines, but they are two very different—though equally important—layers of ensuring your application is solid.
API testing goes straight to the source: the business logic layer. You’re not clicking buttons or looking at screens. Instead, you're sending direct requests to the API endpoints to make sure the core functionality works as expected. Think of it as checking the engine of a car.
UI testing, on the other hand, is all about the user experience. You're testing what the end-user sees and interacts with—the graphical elements, the on-screen workflows, and whether the front end responds correctly when someone fills out a form. This is like test-driving the car to see how it feels on the road.
Both are critical, but API testing gives you a huge advantage. It's faster, far more stable, and fantastic for catching deep-seated logic errors early on, long before they ever bubble up to the user interface.
Understanding this distinction is the key to building a smart, layered testing strategy that covers your application from the inside out.
How Do You Handle Authentication in API Tests?
Almost every real-world API has some form of security, so knowing how to handle authentication isn't just a "nice-to-have" skill—it's essential. Most modern REST APIs rely on authentication tokens like OAuth 2.0 or JWT (JSON Web Tokens) to protect their endpoints.
Your test scripts need to behave just like a legitimate client application. This usually involves a simple, three-step dance:
- Get the Token: Your test starts by hitting a dedicated authentication endpoint with a valid set of credentials.
- Save the Token: The API will send back an access token. Your script needs to grab this token and store it in a variable for later use.
- Use the Token: Every time you make a request to a protected endpoint, you'll need to include that token in the request headers, typically as a
Bearertoken.
Mastering this flow means your tests can interact with secure data and functionality, just as a logged-in user would.
Can You Automate API Testing Without Writing Code?
You absolutely can. Many people think API automation requires being a seasoned developer, but that’s not the case anymore. Tools like Postman and Insomnia have changed the game.
These platforms are incredibly powerful and let you build out entire test suites with a graphical interface. You can write assertions to check responses, chain requests together to simulate complex user journeys, and run everything with a single click—no coding required.
For many teams, this is all they need to create a robust and reliable automation strategy. Of course, if you need to tackle extremely complex logic or build custom integrations, a code-based approach using a library will give you more flexibility.
Ready to test your APIs against real-world failures without risking your production environment? dotMock lets you create mock APIs in seconds to simulate timeouts, errors, and slow responses. Start mocking for free and build more resilient applications today!