Designing REST API That Developers Actually Use
When we talk about designing a REST API, we're really talking about creating a clear, predictable language for different software systems to communicate. The core idea is simple: treat your data as resources that can be accessed and manipulated through standard web protocols. A great API feels intuitive, almost like you can guess the right endpoint and method without even looking at the docs.
Building a Solid API Foundation

Before you write a single line of code, the most critical part of the process is getting the conceptual foundation right. This means stepping back from database tables and schemas and thinking about your system in terms of logical "resources"—the things a developer would actually want to work with.
This mindset is the heart of what's known as the API-first approach, where your API is treated as a first-class citizen, not just a layer tacked on at the end. It's a massive shift in how software gets built, and the numbers back it up. Recent data shows that 82% of organizations have embraced an API-first strategy to some degree. Even more impressively, 25% are now fully API-first companies.
For those who go all-in, the payoff is huge—43% of them generate over a quarter of their revenue directly from their APIs. It’s clear this is more than just a trend; it's a fundamental change in building and monetizing software.
Model Your Data as Resources
So, where do you start? The first practical step is to identify the core "nouns" in your system. If you’re building an e-commerce API, your obvious resources are things like customers, products, and orders. These nouns will become the building blocks of your API endpoints.
It's a common mistake to put verbs in your URLs. Let the HTTP method handle the action.
- Good:
/products - Bad:
/getProductsor/createProduct
This separation is what makes REST so powerful. The URL identifies the what (the resource), and the HTTP verb defines the how (the action). It creates a clean, predictable pattern that developers can instantly understand.
Define Intuitive and Consistent URL Structures
Once you've identified your resources, you need to map them to clean, logical URLs. Consistency is everything here. A predictable URL structure makes your API a pleasure to use and dramatically reduces the learning curve for developers.
Use Plural Nouns for Collections
A simple but powerful convention is to always use plural nouns for your root resources. It’s a clear signal that an endpoint like /users represents a collection of users. From there, you can drill down to a specific one, like /users/123.
Key Takeaway: Stick to plural nouns for collections (e.g.,
/ordersinstead of/order). This small detail makes your API feel polished and professional, eliminating guesswork for the developers who will be using it.
Nest URLs to Show Relationships
When your resources have a clear parent-child relationship, your URL structure should reflect that. For instance, if an order belongs to a specific customer, you can show that relationship directly in the endpoint.
- To get all orders for a specific user:
GET /users/{userId}/orders - To get a single, specific order for that user:
GET /users/{userId}/orders/{orderId}
This nesting creates a logical path that makes the relationships between resources obvious. Developers can discover related data without constantly having to refer back to the documentation, which is a hallmark of a truly well-designed API.
Designing Clear Requests and Responses

Once your URL structure is solid, you have to define the "language" your API and its clients will speak. This is all about the request and response payloads. The ultimate goal? Make the data exchange so intuitive that another developer could almost guess the structure without constantly flipping back to your documentation.
For any modern web API, JSON (JavaScript Object Notation) is the de facto standard. It's lightweight, easy for humans to read, and even easier for machines to parse. By standardizing on the Content-Type: application/json header for your requests and responses, you’re setting a clear and simple contract that makes life easier for everyone.
Crafting Consistent and Readable Payloads
Consistency in your JSON payloads is every bit as critical as it is in your URLs. If a developer sees a field named userId on one endpoint, they should find that exact same field name everywhere else it appears. This predictability is what builds trust and lets developers move faster.
A common convention, and one I strongly recommend, is using camelCase for all your field names (firstName, orderTotal, isActive). Sure, you'll see other styles out there like snake_case (first_name), but what really matters is picking one and sticking to it religiously. When you mix styles, you force developers to second-guess everything, which introduces friction and leads to bugs.
A great API feels like a cohesive product, not a collection of disconnected endpoints. Consistent naming conventions are the invisible threads that tie the entire experience together, making it predictable and professional.
Let's look at a real-world example. Imagine you're building an endpoint to create a new user. A sloppy request body might look something like this:
// Bad Request: Inconsistent and verbose
{
"user_first_name": "Alex",
"USER_LAST_NAME": "Smith",
"EmailAddress": "[email protected]"
}
This is a mess. The mix of snake_case, ALL_CAPS, and PascalCase is just confusing. A much cleaner, more professional version would follow a single style:
// Good Request: Clear and consistent
{
"firstName": "Alex",
"lastName": "Smith",
"email": "[email protected]"
}
That small change makes a world of difference. Always remember you’re designing an interface for other developers—clarity is your single most important feature.
Designing Responses That Empower Developers
A well-designed API response does more than just dump data. It should provide context and give the developer clear next steps. Just serializing a bunch of database rows into a JSON array is a huge missed opportunity. A better approach is to wrap your data in a consistent, structured envelope.
A powerful and widely used pattern involves creating a standard response envelope. This structure provides useful metadata alongside the actual data payload.
data: This holds the primary resource or list of resources being requested.meta: Here, you can put extra information, like details for pagination.links: This object contains navigational links, guiding the client to related actions or resources.
This structure gets rid of ambiguity and makes the API more self-discoverable. For example, a response for a paginated list of products might look like this:
{
"data": [
{
"id": "prod_123",
"name": "Wireless Mouse",
"price": 29.99
}
],
"meta": {
"totalItems": 1,
"itemsPerPage": 10,
"currentPage": 1
},
"links": {
"self": "/products?page=1",
"next": "/products?page=2",
"last": "/products?page=5"
}
}
That links object is a practical implementation of HATEOAS (Hypermedia as the Engine of Application State). It tells the client exactly how to fetch the next page of results without forcing them to manually construct the URL. This makes your API far more resilient to future changes. If you're new to this concept, you can learn more about what an API endpoint is and see how these URLs act as the specific locations for interactions. Ultimately, thoughtful payload design turns a simple data fetch into an interactive, guided experience.
Planning for API Evolution and Security
Your API isn't a "set it and forget it" product. It's a living system that will absolutely change over time. You'll add features, tweak data structures, and squash bugs. The trick is planning for that evolution from day one while building a fortress around your data.
This forward-thinking approach is more critical than ever, especially as APIs become the engine for so much business value. The global open API market is on a rocket ship, projected to soar from $4.53 billion in 2024 to over $31 billion by 2033. That kind of growth shows just how vital stable, secure, and adaptable API design really is.
Choosing Your Versioning Strategy
Nothing will frustrate your users faster than introducing a breaking change without a heads-up. When a developer builds something on top of your API, they're counting on it to be stable. Versioning is your promise to them—a contract that lets you keep innovating without breaking their existing integrations.
There are a few ways to handle this, but they mostly boil down to three main approaches. Let's take a look at how they stack up.
API Versioning Strategies Compared
| Versioning Method | How It Works | Pros | Cons |
|---|---|---|---|
| URL Path Versioning | The version is part of the URL, e.g., /api/v1/users. |
Super explicit and easy to see. Works in any browser without special tools. | Can lead to "cluttered" URLs over time. |
| Custom Header | A custom header specifies the version, e.g., Api-Version: 2. |
Keeps the URL clean and focused on the resource itself. | Less obvious to developers. Requires specific client-side setup to test. |
| Accept Header | Uses the Accept header with a custom media type, e.g., Accept: application/vnd.myapi.v3+json. |
Technically the "purest" REST approach. Allows for fine-grained content negotiation. | Complex and often overkill. Can be cumbersome for developers to work with. |
For most teams, just starting out or even with mature products, URL path versioning is the most pragmatic choice. It's transparent, requires zero special client-side configuration, and just works. It's the path of least resistance for developers, which is almost always a good thing.
For a deeper dive into this topic, check out our complete guide on API versioning best practices.
My Advice: Don't overthink this at the start. Go with URL versioning (
/v1/). It’s clear, everyone gets it, and it solves the immediate problem of protecting your users from breaking changes. You can always decide to support other methods down the road if a specific use case pops up.
Implementing Robust API Security
Security isn't something you bolt on at the end. It has to be baked in from the very beginning. A leaky API is a huge liability, just waiting for a data breach or service abuse. The goal is to protect your data and your users without making life miserable for legitimate developers.
And remember, security isn't just about protecting data in transit. It's equally important to be encrypting sensitive data at rest to protect it on your servers.
Let's walk through the most common authentication methods you'll encounter.
API Keys
This is authentication in its simplest form. You generate a unique, random string (the API key) and give it to a client. They include that key in a request header, usually something like X-API-Key: <your-key>, to identify themselves. API keys are perfect for tracking usage and securing public or internal APIs where you just need to know who is making the call.
OAuth 2.0
When you need to let a third-party app access a user's data on their behalf, OAuth 2.0 is the gold standard. Think of any "Log in with Google" or "Connect your calendar" feature you've ever used. It's a protocol where a user grants specific permissions (called "scopes") to an application without ever handing over their password. It's definitely more complex to set up, but it's non-negotiable for user-centric APIs.
JSON Web Tokens (JWT)
Often used hand-in-hand with OAuth 2.0, JWTs (pronounced "jots") are a compact, self-contained way to send information securely. After a user logs in, the server creates a signed JWT containing "claims" like their user ID and permissions. The client then sends this token back with every request in the Authorization: Bearer <token> header. Because the token is digitally signed, the server can verify it's legit without a database lookup, which makes JWTs fantastic for building stateless, highly scalable systems.
Handling Errors and Large Datasets
https://www.youtube.com/embed/14K_a2kKTxU
A great API doesn’t just work on a sunny day; it proves its worth when things go wrong. Designing for failure, massive result sets, and potential abuse is what separates a fragile API from a production-ready one. The way you handle errors and manage data under stress is a defining feature of the developer experience you provide.
There's nothing worse for a developer than a vague error message. When an API call fails, the response should be a helpful guide, not a cryptic dead end. The goal is to give them enough information to diagnose and fix the issue on their own. This is why a consistent, predictable error format is absolutely non-negotiable.
Properly managing potential issues is a cornerstone of robust API design; you can dive deeper into best practices for API Error Handling to build more resilient systems.
A Consistent Error Response Schema
The first thing to do is settle on a standard JSON structure for all your error responses. This simple act creates predictability, letting developers write code that can reliably parse any failure that comes their way.
A solid error payload should always contain a few key pieces of information:
- A unique error code: This is a machine-readable string like
invalid_api_keythat developers can code against to handle specific errors. - A clear, human-readable message: A simple explanation of what went wrong, such as "The provided API key is not valid."
- Contextual details (optional but recommended): For validation errors, this is your chance to point out exactly which field failed and why.
For instance, if someone tries to create a product but forgets the name field, a well-designed error response would be invaluable.
{
"error": {
"code": "validation_error",
"message": "The request body is missing required fields.",
"details": [
{
"field": "name",
"issue": "This field is required."
}
]
}
}
This response immediately tells the developer not just that something failed, but precisely what and why. This approach drastically cuts down on debugging time and support tickets. You're respecting the developer's time by giving them actionable information.
Smart Pagination for Large Datasets
Sooner or later, your API will need to return a list of resources too large to send in a single go. Trying to return thousands of records at once is slow, horribly inefficient, and can easily crash both your server and the client's application. This is exactly what pagination was made for.
Pagination is simply the process of breaking up large result sets into smaller, digestible "pages." Two main approaches dominate, each with its own pros and cons.
Offset-Based Pagination
This is the classic "page number" method you've seen a hundred times, usually with limit and offset query parameters (?limit=20&offset=40). It’s straightforward to grasp and pretty easy to implement. The downside? It can really drag on large datasets, as the database has to scan and skip all the preceding rows just to find the correct offset.
Cursor-Based Pagination
A more modern and scalable technique uses a "cursor"—a unique, opaque pointer to a specific item in the dataset. The request might look like ?limit=20&after=cursor_xyz. The API returns a cursor pointing to the last item in the current set, and the client uses that exact cursor to request the next page. This method is incredibly performant because it avoids the slow row-counting of offsets.
Key Takeaway: For new APIs, starting with cursor-based pagination is almost always the right call. It scales beautifully, avoids the headache of new data shifting page contents, and provides a much more stable experience for clients fetching lots of data.
Practical Rate Limiting
Finally, every public API needs rate limiting. It's your primary defense against both accidental and malicious abuse, ensuring fair usage for all your clients. Without it, a single buggy script or bad actor could swamp your servers and cause a service-wide outage.
A common and highly effective strategy is the token bucket algorithm, which allows a certain number of requests within a set time window. Crucially, you need to communicate these limits back to the developer through HTTP response headers.
X-RateLimit-Limit: The total number of requests allowed in the current window.X-RateLimit-Remaining: How many requests are left in the window.X-RateLimit-Reset: The UTC timestamp for when the limit will reset.
When a client blows past their limit, your API should respond with a 429 Too Many Requests status code. These headers give developers a clear, programmatic way to build clients that play nice with your API's limits, creating a healthier ecosystem for everyone.
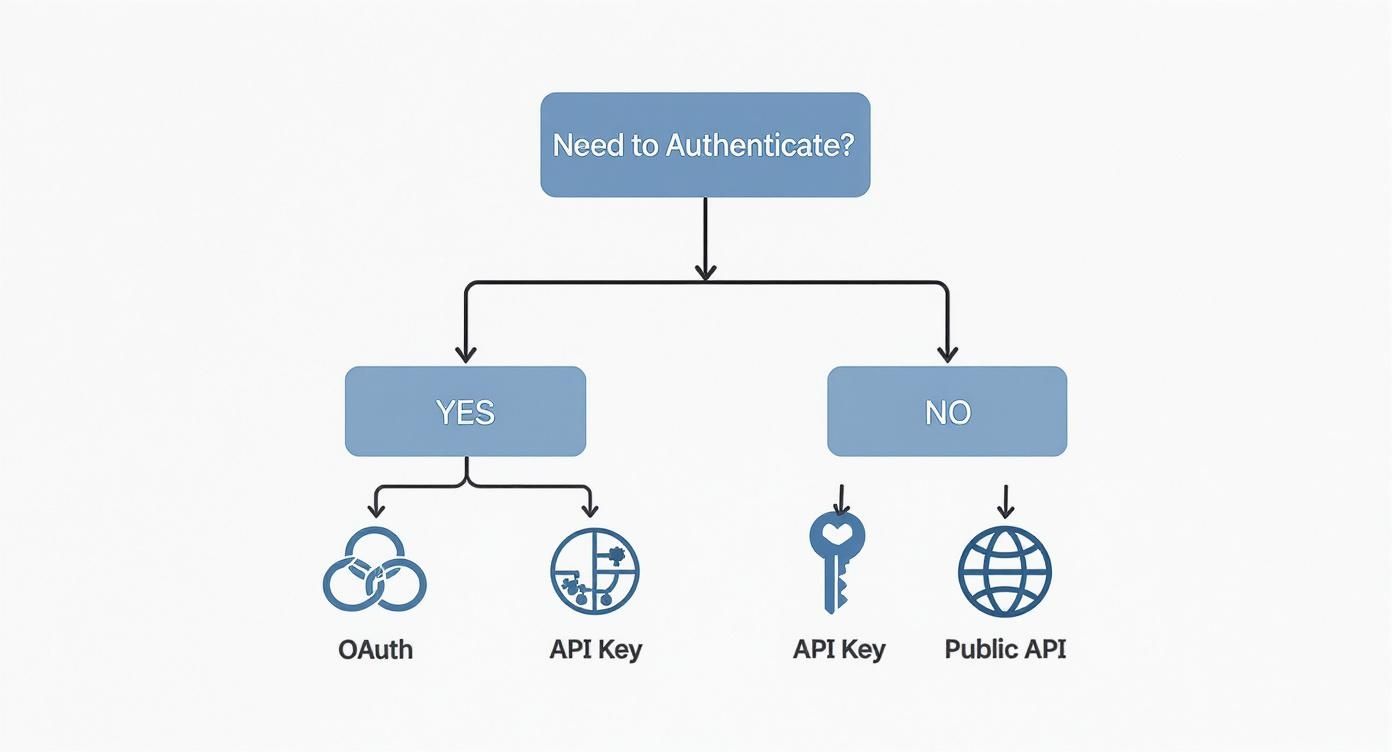
The flowchart above visualizes the decision process for choosing an authentication method. The first critical question is whether authentication is needed at all, leading down paths for public access or more secure methods like OAuth and API Keys.
Documentation and Testing: The Final Mile

You can design the most elegant API in the world, but if nobody knows how to use it, it's just a collection of code. The final, and arguably most critical, phase is creating crystal-clear documentation and a solid testing workflow. This is what turns a technical blueprint into a reliable product that other developers can actually build on.
Good documentation isn't just a "nice-to-have." It’s the contract between you and your API consumers. It tells them exactly what’s available, what to send, and what to expect in return. Without it, you're just inviting a frustrating cycle of guesswork and support tickets.
Define Your API Contract with OpenAPI
The gold standard for this contract is the OpenAPI Specification, which you might know by its former name, Swagger. Think of it as a machine-readable blueprint for your entire API. Instead of writing static documents that are outdated the moment you ship a new feature, you create a single source of truth.
An OpenAPI file is incredibly detailed, covering every nook and cranny of your API design:
- Endpoints: Every single path, like
/usersand/users/{id}/orders. - HTTP Methods: The verbs allowed for each endpoint (
GET,POST,PATCH, and so on). - Parameters: All the specifics on query, path, header, and body parameters, right down to data types and validation rules.
- Response Schemas: The exact JSON structure for every possible outcome, from a 200 OK to a 404 Not Found.
My Takeaway: Adopting OpenAPI is more than just a documentation strategy. Your spec file becomes a force multiplier. It can automatically generate interactive docs, client SDKs in multiple languages, and even server-side code stubs. Suddenly, everyone is working faster and more consistently.
This "design-first" approach keeps your documentation perfectly in sync with your API’s real-world behavior, which is a massive win for developer experience.
Run Parallel Workflows with Mocking
One of the biggest drags on development used to be the waterfall dependency between backend and frontend teams. The frontend would be stuck waiting for the backend to be built and deployed before they could even start wiring up the UI.
API mocking completely shatters that bottleneck.
A mock is essentially a fake API that returns predictable, pre-defined responses based on your OpenAPI spec. This is a game-changer. It allows frontend and QA teams to work in parallel with the backend team, using the API contract as their guide. They can build and test their entire application against the mock server, totally confident that it will behave just like the real thing.
Mocking is also your best friend for testing tricky edge cases. Trying to reliably trigger a 500 server error or a 429 rate-limit response on a live system is a nightmare. With a mock server, it’s a piece of cake.
Tools like dotMock have made this process incredibly straightforward. You can spin up a complete mock environment right from your OpenAPI file, capture live traffic to create mocks on the fly, or even describe endpoints in plain English. This lets you move from design to a testable endpoint in minutes, not days.
A Modern Testing Workflow in Action
Let's walk through a real-world scenario. Your QA team needs to confirm that the app handles an unexpected server outage gracefully when trying to fetch user details.
Here’s how they’d do it with a mock server:
- Set Up the Mock: In a tool like dotMock, you'd find the
GET /users/{id}endpoint. Instead of its normal200 OKresponse, you configure it to return a503 Service Unavailablestatus code, maybe with a two-second delay to simulate network latency. - Point the App: The frontend application's configuration is temporarily changed to point to the mock server's URL instead of the live API.
- Run the Test: The QA engineer navigates to the user profile page in the app, which triggers the API call.
- Verify the Behavior: They observe that after a brief pause, the UI displays a helpful "Service is temporarily down" message instead of crashing, freezing, or showing a cryptic error.
The best part? This entire test happened without bothering a single backend engineer or touching any production infrastructure. By combining a clear OpenAPI contract with a flexible mocking tool, you shrink development cycles, build more resilient applications, and ultimately ship a much better product.
When you're first diving into REST API design, you'll find that some questions pop up again and again. These aren't just academic—they're practical concerns that directly impact how easy your API is to use, how well it scales, and how painful it will be to maintain down the road. Let's tackle some of the most common ones I've seen over the years.
What’s the Best Data Format to Use?
This one's an easy win. While REST doesn't technically force you into a specific format, the industry has overwhelmingly chosen JSON (JavaScript Object Notation). It’s light, easy for humans to read, and just about every programming language and web framework out there can handle it natively. It has become the de facto standard for a reason.
When Should I Use PUT vs. PATCH?
This is a classic point of confusion. Both PUT and PATCH are for updating resources, but they have very different jobs.
PUTreplaces a resource entirely. If youPUTto/users/123, the server expects you to provide the complete user object in the request body. If you leave out a field, the server will likely interpret that as you wanting to nullify it. It's a full replacement.PATCHis for partial updates. This is what you'll use most of the time. APATCHrequest only needs the fields you actually want to change. Just updating an email? Send only the email field. It's far more efficient and less error-prone.
My Advice: Default to using
PATCHfor all updates unless you have a very specific reason to require a full resource replacement. It’s safer, uses less bandwidth, and clearly signals the intent to modify, not replace.
Should I Put Verbs in My URLs?
Absolutely not. This is one of the foundational principles of REST. Your URLs should represent your resources—the "nouns" of your API (like /products or /orders). The action you want to perform—the "verb"—is defined by the HTTP method itself (GET, POST, DELETE, etc.).
Seeing something like POST /createNewOrder is a major red flag. It’s redundant and breaks the clean, predictable pattern REST provides. The correct, RESTful way is simply POST /orders. The method is the verb; the URL is the noun. Keep them separate.
How Does REST Compare to GraphQL or gRPC?
It’s smart to ask when REST is the right tool for the job. Different API styles solve different problems, and it’s not always a one-size-fits-all situation.
| API Style | Best For | Standout Feature |
|---|---|---|
| REST | Public APIs, standard web/mobile apps, simple CRUD. | It's built on standard HTTP, making it simple, scalable, and universally understood. |
| GraphQL | Mobile apps and complex frontends with varied data needs. | Eliminates over-fetching by letting clients ask for exactly the data they need in a single request. |
| gRPC | Internal, high-performance microservices communication. | Incredibly fast due to its use of binary protocols (Protobuf) and support for streaming. |
For most public-facing APIs where simplicity and broad compatibility are key, REST is still the reigning champion.
Finally, people often ask if REST APIs have to be stateless. The answer is a definitive yes. This is a core constraint of the REST architectural style. Each request from a client must contain every piece of information the server needs to process it. The server shouldn’t have to remember anything about the client from previous requests. This is what makes REST so scalable—any server in a cluster can handle any request at any time.
Ready to stop waiting on backend teams and start testing your API designs today? With dotMock, you can create production-ready mock APIs from an OpenAPI spec, live traffic, or even plain English in seconds. Simulate errors, latency, and edge cases to build truly resilient applications. Get started for free at dotMock.