Your Guide to Building an API from Scratch
When you're about to build an API, you hit a fork in the road right away: do you design it first or just start coding? The API-first approach champions creating a detailed specification before anyone writes a single line of code. This spec acts as a binding contract, keeping everyone on the same page and sidestepping the kind of expensive rework that sinks timelines.
Why You Should Adopt an API-First Strategy

Jumping straight into coding is like trying to build a house without a blueprint. The backend team might be busy framing a kitchen where the front-end team was expecting a bathroom. It’s a recipe for confusion, delays, and a whole lot of frustration.
An API-first strategy is that blueprint. It guarantees that every team—front-end, back-end, and QA—is building from the exact same plan. This "contract" is typically an OpenAPI (formerly Swagger) specification that spells out every endpoint, request, and response before the actual implementation begins.
The Power of Parallel Development
The most immediate win here is the ability to unlock parallel workflows. Once that API spec is locked in, your teams can get to work right away without waiting on each other.
- Front-end developers can take the spec, plug it into a tool like dotMock to spin up a live mock server, and start building the UI immediately. No more blocking.
- Back-end developers can concentrate on the business logic, knowing that as long as they stick to the contract, it will connect seamlessly with the front end.
- QA engineers can start writing automated tests against that very same mock server, flagging integration problems weeks or even months before the back end is fully functional.
This simple shift dismantles dependencies and radically compresses development cycles. To really get this right, a solid grasp of RESTful API design principles is essential for building interfaces that are not just functional but also consistent and easy to work with.
Driving Clarity and Better User Experiences
This approach forces the tough conversations to happen early. You're compelled to iron out data structures, error handling, and authentication from the get-go. All this upfront planning naturally results in an API that's more consistent, predictable, and genuinely user-friendly.
To see just how much this can impact your team, you can learn more about the philosophy behind the https://dotmock.com/blog/api-first-approach and why it's become a cornerstone for modern software development.
By designing your API with the end consumer in mind from day one, you inherently build a better product. The API stops being a technical afterthought and becomes a core part of your user experience.
The industry is clearly voting with its wallet. The API management market is projected to swell to USD 7.16 billion in 2024, a huge jump from USD 4.5 billion in 2022. This isn't just a trend; it's a fundamental shift in how we build software.
API-First vs Code-First Development
To put it all in perspective, let's quickly compare the two dominant methodologies. The table below breaks down where the API-first approach really shines.
| Aspect | API-First Approach | Code-First Approach |
|---|---|---|
| Foundation | The API contract (spec) is the source of truth. | The code implementation is the source of truth. |
| Team Workflow | Enables parallel development; teams work independently. | Creates dependencies; front-end often waits for back-end. |
| Consistency | Promotes a consistent design across all endpoints. | Can lead to inconsistencies as features are added ad-hoc. |
| Feedback Loop | Gathers stakeholder feedback early in the design phase. | Feedback often comes late, after significant code is written. |
| Risk | Reduces risk of integration failures and costly rework. | Higher risk of misalignment and integration issues late in the cycle. |
| Documentation | Documentation is generated automatically from the spec. | Documentation is a separate, manual task that often lags behind. |
As you can see, API-first isn't just a different order of operations; it's a strategic decision that impacts everything from team velocity to the final quality of your product. This guide will walk you through building an API using this powerful, forward-thinking strategy.
Crafting Your API Spec with OpenAPI

When you decide to go API-first, the OpenAPI specification becomes your north star. It’s not just documentation; it’s the blueprint for your entire API. I like to think of it as the architectural drawing that defines every single interaction before anyone writes a line of code. This spec, usually a YAML or JSON file, is where you’ll map out every endpoint, define your data structures, and establish the ground rules for how your API behaves.
Let's walk through a real-world example. Imagine we're building a simple project management API. We know we'll need to fetch a list of projects and create new tasks. The OpenAPI spec is where we translate those abstract ideas into concrete definitions. You’d specify that a GET /v1/projects call retrieves the project list, while a POST /v1/tasks request creates a new task. Simple, clear, and unambiguous.
Defining Your Endpoints and Schemas
This is where the real work begins. For every endpoint, you need to be crystal clear about what it does, what it needs, and what it gives back. This means detailing the HTTP method (GET, POST, etc.), the exact URL path, and any parameters it expects.
But a truly solid spec goes deeper by defining the "shape" of the data using schemas. For our POST /v1/tasks endpoint, the request body schema might look something like this:
- title: A required string.
- description: An optional string.
- projectId: An integer that links the task to a specific project.
You’ll do the same for your responses. A successful 200 OK from GET /v1/projects should return an array of project objects, each containing an id, name, and creationDate. This level of detail eliminates all the guesswork down the line.
Key Takeaway: A well-defined spec is the ultimate collaboration tool. It guarantees that the front-end dev building the "Add Task" form and the back-end dev working on the database logic are building to the exact same contract. No more integration headaches.
Tools like the Swagger Editor are fantastic for this. You can write your YAML on one side and see it instantly rendered as interactive API documentation on the other. It’s an invaluable way to spot errors and get everyone on the same page.
Best Practices That Actually Matter
Writing a spec is more than just listing endpoints; it's about building a predictable and developer-friendly API. Small things make a huge difference, like using consistent naming conventions—think camelCase for properties and plural nouns for collections (e.g., /projects instead of /project).
Versioning is another non-negotiable. Putting the version number right in the path, like /v1/, is a straightforward and explicit strategy. It lets you introduce breaking changes in a future /v2/ without crippling existing integrations.
If you skip this upfront planning, you’re inviting chaos. It's shocking, but industry reports show that 78% of organizations don't even know how many APIs they manage, and 74% suspect a fifth of them are totally unmanaged "zombie" APIs. A strong specification process establishes governance from day one, helping you sidestep this kind of API sprawl.
Once your spec is locked in, the next move is to make it real. This is where dotMock shines. You can simply import your OpenAPI file and generate a fully functional mock server in seconds. It’s the perfect bridge between design and development, finally allowing your teams to work in parallel.
Bringing Your API to Life with dotMock
Your OpenAPI specification isn't just a document—it's the blueprint for a working API. With your openapi.yaml file ready, you can jump straight from abstract design to a tangible, interactive API without waiting for a single line of backend code. This is where a tool like dotMock really shines, helping you build with speed and confidence.
Forget spending days scaffolding a custom mock server. The whole point here is to get a live, fully functional one up and running in minutes. This immediate feedback loop is a massive win for front-end teams, who can finally start building and testing against a reliable contract right away.
From Spec to Live Endpoints in Seconds
Getting started is refreshingly simple. You just upload your OpenAPI file. DotMock immediately parses the spec and spins up a cloud-hosted server complete with every endpoint you defined. All of a sudden, GET /v1/projects isn't just a line in a YAML file; it's a live endpoint you can hit that returns actual data.
Here's a look at the interface where the magic begins.

This simple step is your gateway to decoupling front-end and back-end workflows, letting both teams work in parallel without blocking each other.
This instant transformation from a static file to a live server is the heart of an API-first workflow. It dissolves the most common development bottleneck: the front-end team waiting for the back-end to be "ready." You can follow the dotMock quickstart guide to get your own mock server running in less than a minute.
Crafting Realistic and Dynamic Mock Data
Let’s be honest, a mock API that only returns static "lorem ipsum" is barely useful. To build a solid user interface, your team needs data that actually reflects the real world. A user's name should look like a real name, an email address needs to be a valid email, and a product ID should be a unique identifier.
This is where dotMock really excels, letting you generate dynamic and representative data that goes far beyond simple placeholders. You can configure your endpoints to return:
- Realistic Data Types: Generate random but correctly formatted names, addresses, dates, and UUIDs.
- Variable Responses: Create lists with a changing number of items—for instance, a project list that returns between 5 and 15 projects on each call.
- Contextual Payloads: Make sure the data makes sense in context, so your UI doesn't break from unexpected or nonsensical values.
By simulating production-like data, you empower your front-end team to build for reality. They can test pagination, handle long strings that might break a layout, and ensure the UI gracefully manages empty data states—all before the real API even exists.
This focus on data realism is what separates a basic mock from a powerful development tool. It lets developers and QA engineers catch edge cases early and build a much more resilient application. The ultimate goal is to create a mock so accurate that switching to the production backend becomes a non-event, often requiring just a simple change to the base URL.
Simulating Failure to Build Resilient Apps
A great app handles errors with grace, but you can't build for failure if your mock API only returns a perfect 200 OK every time. Let's be real: an API that works flawlessly is a fantasy.
In the real world, servers go down, networks get congested, and authentication tokens expire at the worst possible moments. This is where we dive into one of the most powerful features of API mocking: intentionally configuring things to break.
Building an API that succeeds is only half the battle. You also need to ensure your application doesn't just crumble when things inevitably go wrong. By simulating these real-world problems, you give your front-end and QA teams the power to build and test UIs that don't shatter when the unexpected happens. This proactive approach to error handling is what separates a fragile product from a truly stable and professional one.
Crafting Realistic Error Responses
The first step in building resilience is teaching your application how to react to common HTTP errors. With a tool like dotMock, you can move beyond the happy path and start simulating the entire spectrum of API behavior.
This means setting up rules that trigger specific error codes based on certain conditions. For example, you can configure an endpoint to return a 401 Unauthorized error if a request is missing a valid Authorization header. Or maybe you want to simulate a temporary backend issue by having an endpoint occasionally respond with a 503 Service Unavailable status.
These simulations are absolutely crucial for testing user-facing features, like:
- Prompting the user with a "Login Required" message when a
401is received. - Showing a friendly, helpful error page for
500server errors instead of a terrifying blank screen. - Implementing a "Retry" button when a network request times out or fails.
A mock API gives you a safe sandbox to break things on purpose. You can test every possible failure path without ever touching a production server, ensuring your UI handles every scenario gracefully.
This bar chart visualizes a common distribution for simulated API failures, focusing on server errors, authentication issues, and network latency.
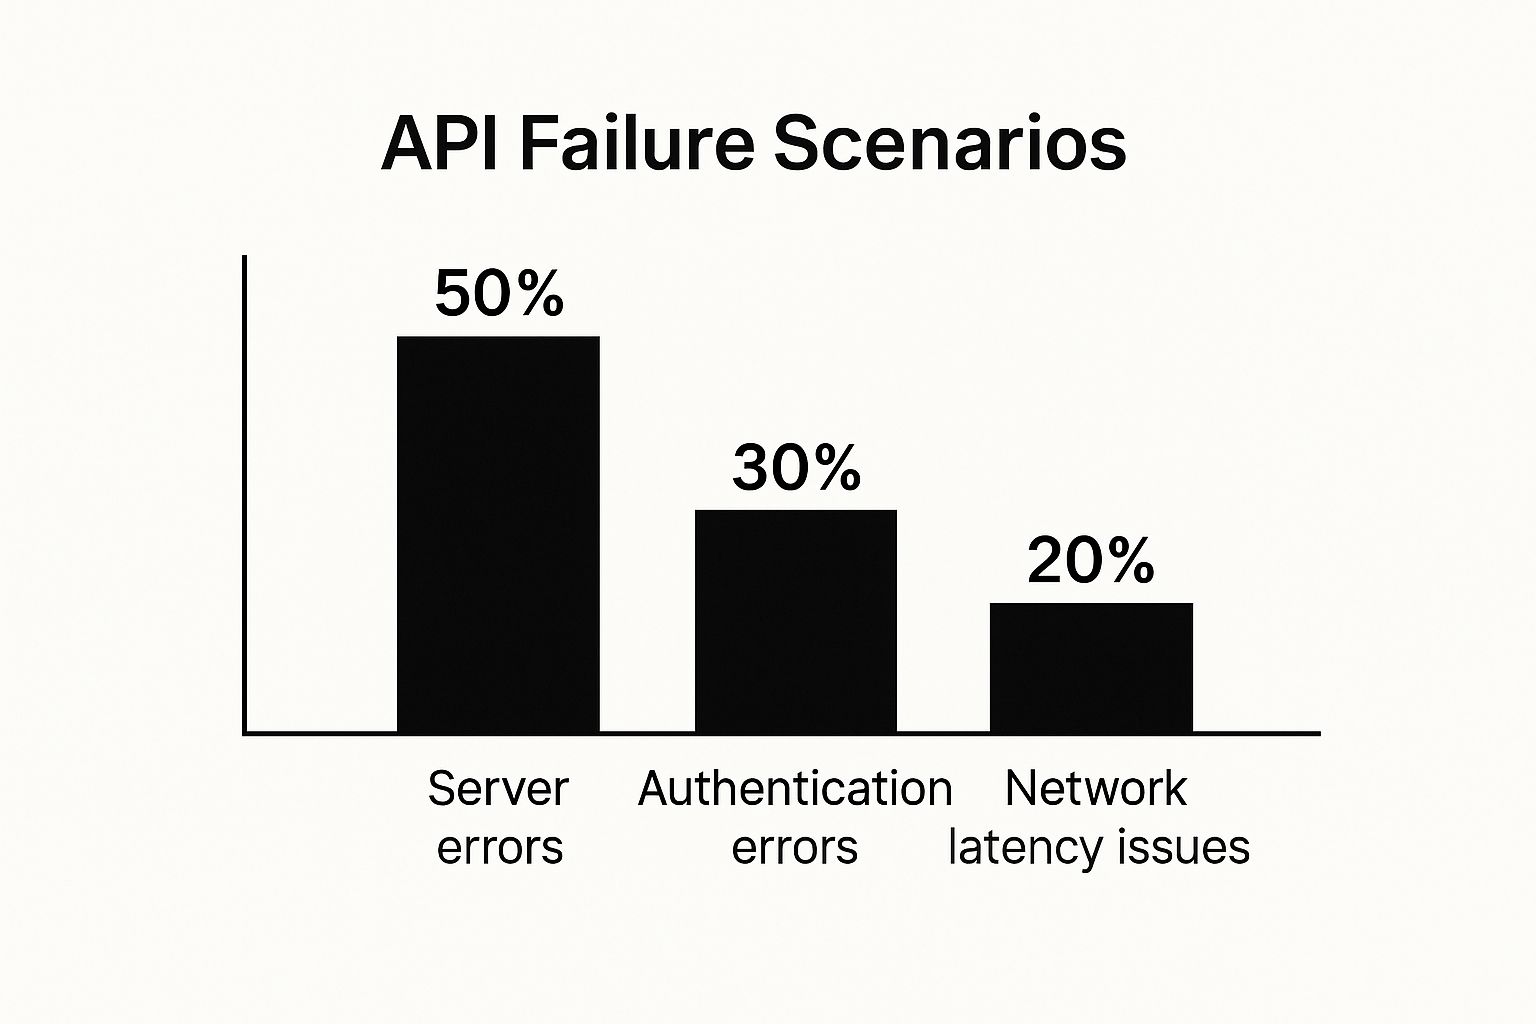
As you can see, internal server errors are often the most frequent failure type to plan for, followed closely by authentication and network-related issues.
Common HTTP Status Codes for Failure Scenarios
To get started, it helps to have a quick reference for which HTTP status codes are most important to simulate. This table covers the essentials for building comprehensive front-end error handling.
| Status Code | Meaning | When to Simulate |
|---|---|---|
400 Bad Request |
Client-side error | Test how your app handles invalid user input, like a malformed email in a registration form. |
401 Unauthorized |
Authentication required | Simulate what happens when a user's session expires or they try to access a protected route. |
403 Forbidden |
Access denied | Useful for testing role-based permissions, like a standard user trying to access an admin page. |
404 Not Found |
Resource not found | Check if your UI gracefully handles requests for data that doesn't exist (e.g., a deleted user). |
500 Server Error |
Internal server error | The classic "something went wrong" scenario. Ensure your app shows a non-breaking error message. |
503 Unavailable |
Service unavailable | Perfect for mimicking server downtime for maintenance or high traffic. Test your retry logic. |
By simulating these common responses, you can ensure your application has a defined, user-friendly behavior for nearly any problem the back end might throw at it.
Simulating Network Latency and Timeouts
Error codes are just one piece of the puzzle. We all know network conditions can be notoriously unreliable, and users on slow connections deserve a good experience, too.
A good mock API lets you go further by introducing artificial delays. This simulates a slow network or a backend service that's struggling under heavy load.
You can configure a specific endpoint to take 2-3 seconds to respond, which is invaluable for testing how your application's loading indicators and UI state management perform under stress. This helps answer critical questions: Does the UI freeze up? Does the user get clear feedback that something is happening in the background?
Testing these scenarios is key to creating a product that feels responsive and reliable for all users, regardless of their network quality. When you master failure simulation, you're not just building an API; you're engineering a truly resilient user experience.
Weaving Mocks into Your Daily Workflow
A mock API is only as good as its integration. It’s one thing to have a standalone tool, but the real value comes when it’s a seamless part of your team's day-to-day process. This means getting your dotMock server embedded right where your developers and testers live—from their local machines to your automated CI pipeline.
Powering Local Front-End Development
The most common and immediate win is hooking the mock API into a front-end development environment. It doesn't matter if your team is on React, Vue, Angular, or something else; the setup is usually a piece of cake. All it takes is a small tweak, like setting up a proxy or an environment variable, to point all API calls to the dotMock URL instead of a backend that’s either still being built or notoriously unstable.
For example, if you're working in a React app scaffolded with create-react-app, you just add a "proxy" key to your package.json file. Point it to your mock server's address, and you're done. Just like that, every API request from your local dev server gets routed to your reliable mock. This lets developers build out entire user interfaces against predictable data and even simulate specific error states without any backend drama.
Automating Tests in Your CI Pipeline
Getting mocks running locally is a great first step, but the real power move is to wire them into your Continuous Integration (CI) pipeline. This is where you can seriously speed up your testing cycles and find integration bugs way earlier in the process. When you run your automated test suite against the mock server, you completely cut the cord from flaky staging environments.
This means no more failed end-to-end tests because someone decided to deploy to the backend staging server mid-run. Your CI pipeline becomes faster, more reliable, and completely self-sufficient.
Bringing mocks into a CI tool like GitHub Actions, GitLab CI, or Jenkins usually boils down to a few key actions:
- Set the API URL via environment variables: Your CI configuration just needs one variable pointing to the dotMock instance. Your test runner will pick it up automatically.
- Run end-to-end tests with confidence: Tools like Cypress or Playwright can now run against a stable, predictable API. This lets you test gnarly user flows that depend on specific API responses or error conditions without any guesswork.
- Spot regressions before they merge: If a front-end change accidentally breaks the established API contract, the CI build fails—instantly. This simple check stops integration problems from ever polluting your main branch.
This approach fundamentally changes your testing reliability and development velocity for the better. By treating the API contract as the single source of truth and testing against a mock that enforces it, your team can build and ship with a whole new level of confidence. You're not just building features anymore; you're building a truly resilient system.
Common Questions About Building an API
Even with a solid plan, a few questions always pop up when you're taking an API-first approach. Let’s walk through some of the common hurdles teams face during the design and mocking phases so you can sidestep them.
What’s the Real Benefit of DotMock Over a Custom Mock Server?
It really comes down to speed and consistency. I've seen teams spend weeks building and maintaining their own custom mock servers. It's a constant drain—another piece of infrastructure you have to manage, update, and painstakingly keep in sync with your API contract.
Tools like dotMock completely remove that burden. You feed it your OpenAPI specification, and it spits out a fully compliant mock server in seconds. This ensures your mock is always a perfect mirror of your API contract, acting as a single source of truth for everyone. Plus, you get powerful features like failure simulation and dynamic data generation right away, which are a huge pain to build from scratch.
The goal is to spend time building your product, not building tools to build your product. A dedicated mocking platform frees your team to focus on creating features, not maintaining internal tooling.
By handing off the creation and maintenance of the mock server, you speed up the entire development cycle and guarantee every team member is working against the same, accurate contract.
How Should I Handle API Versioning with This Method?
The API-first approach makes versioning so much clearer. The standard best practice is to pop the version right into your API path, like GET /api/v1/projects. It's explicit, easy to read, and leaves no room for confusion.
When you need to introduce breaking changes, the process is surprisingly simple:
- First, you create a new version of your spec file (e.g.,
openapi-v2.yaml). - Next, you generate a new set of mock endpoints for that version, like
/api/v2/projects. - All the while, the old version (
/api/v1/) stays stable and fully operational.
This strategy lets different teams migrate to the new version on their own timeline without breaking existing apps. Everything is managed transparently right in your specifications.
Can I Use a Mock API for Performance Testing?
This is a really important distinction to make: mock APIs are built for functional and integration testing, not for performance or load testing. A mock server is brilliant at giving you predictable responses to check your application's logic and user flows. It's perfect for making sure your front end handles all the different data shapes and error states correctly.
But a mock server won't behave like a real production backend under stress. It doesn't have the database latency, network bottlenecks, or processing load of your actual business logic. When it's time for load testing, you absolutely need a dedicated staging environment that mirrors your production setup as closely as possible.
What Happens When the Actual Backend Is Ready?
This is the best part. The switch from mock to production is usually incredibly smooth. Since your front-end team built the application against a mock that strictly followed the OpenAPI contract, the integration often boils down to changing a single base URL in a config file.
Because both the mock and the real backend follow the exact same spec, the data structures, endpoints, and error responses should line up perfectly. This practically eliminates those frustrating integration bugs and last-minute scrambles, turning what used to be a high-stress phase into a non-event.
Ready to stop waiting and start building? With dotMock, you can generate a live, shareable mock API from your spec in under a minute. Try dotMock for free and accelerate your development workflow today.