Guide to automating ui testing: Boost QA
Automated UI testing is all about getting software to run through your app's user interface, checking that everything works just like a real person would, only way faster. It ditches the tedious, error-prone manual clicking and replaces it with scripts that can run around the clock. This means you can catch issues the moment new code is introduced, long before they become a problem for your users.
Why Automating UI Testing Is a Game-Changer for Dev Teams
Let's be real: manual UI testing is a major bottleneck. In any modern development shop, the QA process can easily grind a feature release to a halt. Your engineers end up spending hours, sometimes even days, just clicking through the same old user flows, hunting for regressions that a machine could have found in minutes. It's not just slow—it's a surefire way to burn out your team on repetitive tasks.
When you automate your UI testing, you flip the script entirely. QA stops being a roadblock and starts being an enabler. A well-built automated test suite gives you feedback almost instantly, letting developers spot and squash bugs right after pushing their code.
The Impact on Speed and Confidence is Huge
Think about how two different teams would handle a new feature release.
- Team A (The Manual Way): They push the feature, then cross their fingers and wait a full day for manual regression testing. A QA engineer eventually finds a showstopper bug, and the feature gets kicked back to the dev team. This painful cycle repeats, pushing the release back by days.
- Team B (The Automated Way): They push the feature, and an automated UI test suite kicks off immediately in their CI/CD pipeline. In under 10 minutes, a test fails, pinpointing the exact regression. The developer fixes it and merges the code with total confidence—all on the same day.
This isn't just about moving faster; it's about creating a safety net. This safety net gives your developers the freedom to ship code without constantly worrying about what they might break. This shift is one of the biggest benefits of automated testing you'll see.
The real magic of automating UI testing is that it lets your team stop focusing on mind-numbing verification and start doing creative, exploratory testing. Once the machines take over the boring stuff, your people are free to find those tricky, unexpected bugs that automation can't.
A Must-Have for Agile and DevOps
In any Agile or DevOps environment, you live and die by your ability to iterate quickly. Automated UI tests are really the only way to maintain quality without sacrificing that speed. They're what allow teams to deploy multiple times a day and still keep the quality bar high. For a deeper look at how this fits into the bigger picture, this ultimate software testing checklist is a great resource.
The numbers back this up, too. The automation testing market is expected to reach USD 36.9 billion by 2025 and skyrocket to USD 140.4 billion by 2035. This explosive growth just shows how essential automation has become for building reliable digital products today.
Building Your UI Test Automation Environment
Getting your environment right from the start saves countless headaches later. A solid foundation is crucial for UI automation because it directly impacts the reliability and scalability of your entire test suite. If you don't nail this part, you're just setting yourself up for flaky tests and a maintenance nightmare down the road.
We're going to build our setup around a modern JavaScript stack using Playwright, a fantastic choice known for its speed and rich feature set. The very first thing you need is Node.js and its trusty package manager, npm. This is the runtime that will execute all your tests and handle your project's dependencies.
Initializing Your Project
With Node.js installed, pop open your terminal, head to your project folder, and let's get things started. Running npm init -y will quickly generate a package.json file. Think of this file as the heart of your project—it tracks all your scripts and dependencies in one place.
Now for the fun part: adding Playwright. A single command does all the heavy lifting:npm init playwright@latest
What's great about this command is that it does more than just install a library. It scaffolds a whole project structure for you, complete with configuration files, some example tests to learn from, and even the browser binaries for Chromium, Firefox, and WebKit. It's a huge time-saver and gets you from zero to a running test in minutes.
Why Choose Playwright
Look, Selenium has been the old standby for years, and Cypress offers a really slick developer experience. But Playwright hits a real sweet spot. It gives you robust cross-browser support right out of the box and comes with killer features like auto-waits, which intelligently pause until an element is actually ready before trying to click it. That one feature alone wipes out a huge source of the flakiness that plagues so many UI test suites.
Plus, its API just makes sense. It’s intuitive, which means both developers and QA engineers can jump in and write clean, effective tests without a steep learning curve. And when you're automating UI tests, the clarity of your test scripts is just as important as whether they pass or fail. A clear script is a maintainable script.
Your test environment should be treated like production code. Version control it, keep dependencies updated, and document your configuration choices. This discipline ensures consistency across your team and in your CI/CD pipeline.
A well-structured environment also needs to handle different deployment stages. You'll inevitably need to manage variables for local, staging, and production URLs or API keys. Using a .env file is a standard practice here; it keeps sensitive data out of your codebase and makes it simple to switch configurations.
This setup is about more than just checking if buttons work. To help you build a truly robust testing environment, this overview of various automated accessibility testing tools can provide some great insights into ensuring your application is usable by everyone. Building a comprehensive environment means thinking about all facets of quality from day one.
Writing Resilient and Maintainable UI Test Scripts
Alright, with your environment all set up, it's time to get into the heart of it: writing test scripts. The real win in UI automation isn't just getting a test to pass once. It's about crafting scripts that are resilient, easy to maintain, and simple for anyone on the team to understand.
Let's be honest, scripts that shatter every time a developer makes a small UI change are more trouble than they're worth. They create a constant cycle of fixing and re-fixing, which quickly kills your team's confidence in the whole automation effort.
Nail Your Selectors First
The bedrock of any durable UI test is the way you find elements on the page. It’s so tempting to just right-click in your browser's dev tools and copy a long, complex CSS path or XPath. Don't fall into that trap. Those selectors are incredibly brittle because they're tightly coupled to the exact structure of the HTML. The moment a developer wraps a button in a new <div>, your test is broken.
A much smarter way to work is to use selectors that aren't tied to the DOM structure. This is where a custom data attribute, like data-testid, becomes your best friend.
By adding something as simple as data-testid="login-button" to your button element, you create a stable, predictable hook just for testing. Your test script can now find that element every single time, no matter how much the surrounding code changes. This tiny bit of upfront effort pays off massively in the long run.
A great UI test script tells a story about a user's journey, not about the intricate structure of your HTML. Using
data-testidhelps you focus on what the user interacts with, not how it's built.
This focus on stability and clear intent is a fundamental principle for anyone serious about UI automation. It's a move away from just "checking a box" to truly ensuring a predictable user experience. The widespread adoption of tools like Selenium by over 31,854 companies globally isn't an accident; it underscores the need for robust testing methods to handle today's complex UIs. You can discover more insights about this trend and how it's shaping modern software quality.
Choosing the right selector is crucial for building a test suite that doesn't constantly break. While data-testid is often the gold standard, it's helpful to understand the pros and cons of all your options.
Choosing the Right Selector for Your UI Tests
| Selector Type | Example | Reliability | Best For |
|---|---|---|---|
| Data Attribute | [data-testid='login-btn'] |
Very High | The go-to choice for stable tests. Creates a contract between dev and QA. |
| ID | #username |
High | Great for unique elements, but developers might change them without notice. |
| ARIA Role/Label | [role='button'][aria-label='Submit'] |
High | Aligns tests with accessibility, making them user-centric and stable. |
| Class Name | .btn-primary |
Medium | Often tied to styling. Prone to change when the UI gets a facelift. |
| Tag Name | button |
Low | Too generic. Should only be used when scoping within another, more specific element. |
| XPath | //div/div[2]/button |
Very Low | The most brittle. A last resort when no other option is available. |
Ultimately, a stable selector is one that describes what the element is, not where it is. Stick to data attributes and accessibility roles, and you'll spend less time fixing tests and more time building coverage.
Keep Your Tests Clean with the Page Object Model
As your app gets bigger, your test suite will too. If you're not careful, you'll end up with duplicated code all over the place. Imagine the "Submit" button's selector changes—are you really going to hunt it down and update it in ten different test files? That's a maintenance nightmare.
This is exactly the problem the Page Object Model (POM) was designed to solve.
POM is a design pattern that structures your test code logically. You create a dedicated object, or class, for each page or major component in your application. This object becomes the single source of truth for all the selectors and actions related to that piece of the UI.
Here’s how it works in practice. For a login screen, you’d create a LoginPage class that contains:
- Selectors for the username field, password field, and the submit button.
- A method like
login(username, password)that bundles the actions of filling out the form and clicking the button.
Now, your actual test script becomes incredibly clean and readable. Instead of a messy chain of type and click commands, your test is a single, expressive line: loginPage.login('testuser', 'password').
The best part? When the UI of the login form eventually changes, you only have to update the LoginPage object. Every single test that uses it is instantly fixed. This separation of concerns is what makes a test suite manageable and scalable over the long haul.
Isolating Your Frontend with Backend Mocking
Let's talk about one of the most frustrating parts of UI test automation: the flaky test. You know the one. You write a flawless script, everything looks perfect, but it fails randomly. Why? The staging backend is down, an API is crawling, or the database is full of junk data. These failures have absolutely nothing to do with your UI, yet they stop your test run dead in its tracks and make everyone lose faith in the automation suite.
This is exactly why backend mocking is such a game-changer. By simulating your backend services, you can completely cut your frontend application off from those unpredictable external systems during testing. This ensures your UI tests are doing what they're supposed to do—verifying the UI and only the UI. The result? Faster, more reliable tests that don't depend on anyone else's schedule.
Gaining Control with dotMock
This is where a tool like dotMock really shines. It's built to solve this exact problem. Instead of letting your app make real HTTP requests to a live backend during a test, dotMock intercepts those calls and serves up predictable, pre-defined responses you control. This whole process is a core part of a practice called service virtualization.
For example, imagine you're testing a user profile page that fetches data from an /api/user/123 endpoint. With a mocking tool, you just tell your test environment to catch any request to that endpoint and instantly return the exact JSON payload you want.
By simulating your backend, you turn unpredictable external dependencies into stable, controlled parts of your test setup. This one change can wipe out up to 80% of test flakiness caused by network hiccups or server problems.
This gives you total control. Your tests will pass whether the real backend is deployed, down for maintenance, or not even built yet. It's a huge win for teams where frontend and backend development happens at the same time—no more waiting around for the backend to be ready. To really get a handle on this, you can learn more about what service virtualization is and see how it fits into modern development.
Simulating Real-World Scenarios
The real magic of mocking isn't just about testing the "happy path." A truly solid UI has to handle all sorts of strange backend responses gracefully. Mocking is the perfect way to test these edge cases safely and reliably, without having to beg a backend developer to break their server for you.
You can easily set up your mock server to replicate scenarios that are a nightmare to create on a live backend. This is how you build a truly resilient UI.
Here are a few critical scenarios you should be simulating:
- API Errors: What does your UI do when the server fires back a
500 Internal Server Erroror a404 Not Found? Does it show a friendly error message, or does the whole app crash and burn? - Empty Data States: What happens when an API returns an empty array
[]? You can confirm your app correctly displays a "No items here!" message instead of just a confusing blank screen. - Network Latency: You can build an artificial delay into the mock response to see how your app behaves on a slow connection. It’s the perfect way to test your loading spinners and skeleton screens.
- Unexpected Payloads: Try simulating responses with missing fields or funky data formats. This ensures your frontend code doesn't shatter the moment an API contract changes unexpectedly.
By intentionally testing these failure modes, you shift from just checking if things work to proving your application is genuinely tough. This proactive approach catches an entire class of bugs that traditional end-to-end tests often miss, leading to a far more stable and professional user experience.
Weaving UI Tests into Your CI/CD Pipeline
Let’s be honest: writing automated tests is just one part of the equation. Their real power is unleashed when they run automatically, acting as a constant safety net every time your code changes. Integrating your UI tests into a Continuous Integration/Continuous Deployment (CI/CD) pipeline is what turns them from a chore into an automated quality gatekeeper.
This integration makes sure every new line of code is checked against your UI test suite before it even has a chance to be merged. You're building a system where bugs are caught in minutes, not days. The whole point is to make quality a seamless, ongoing part of development, not a stressful bottleneck at the end.
Setting Up Automatic Triggers with GitHub Actions
For this guide, we'll use GitHub Actions. It's a natural fit since it lives right where your code does. The core idea is to create a simple workflow file (written in YAML) that tells GitHub when and how to run your tests. A fantastic, real-world trigger is on every pull_request aimed at your main branch.
With this in place, the moment a developer opens a pull request, your UI tests spin up and get to work. The results are posted directly back to the pull request, giving a clear pass/fail signal before a human reviewer even needs to look at it.
Your CI/CD pipeline is basically an automated code reviewer that never gets tired. It mechanically checks every single submission for regressions, which frees up your team to focus on the things a machine can't—like architecture, logic, and the user experience.
This immediate feedback loop is a game-changer for finding and fixing bugs quickly. If you want to go deeper on building out these kinds of workflows, check out our guide on continuous integration best practices for more tips on creating efficient pipelines.
Crafting a Solid Workflow File
Building the workflow file is all about defining a series of jobs and steps. You’re essentially writing a script that sets up the perfect environment and runs the exact commands needed to execute your tests in a clean, isolated container every time.
Here’s what a typical workflow.yml file might look like for a Playwright project:
name: Playwright Tests
on:
pull_request:
branches: [ main, develop ]
jobs:
test:
runs-on: ubuntu-latest
steps:
- name: Check out repository code
uses: actions/checkout@v4
  - name: Set up Node.js
    uses: actions/setup-node@v4
    with:
      node-version: '18.x'

  - name: Cache npm dependencies
    uses: actions/cache@v4
    with:
      path: ~/.npm
      key: ${{ runner.os }}-node-${{ hashFiles('**/package-lock.json') }}

  - name: Install dependencies
    run: npm ci

  - name: Install Playwright browsers
    run: npx playwright install --with-deps

  - name: Run Playwright tests
    run: npx playwright test

  - name: Upload test results on failure
    if: failure()
    uses: actions/upload-artifact@v4
    with:
      name: playwright-report
      path: playwright-report/
      retention-days: 30
This workflow is methodical, but let’s pull out a few key steps that make a real difference:
- Caching Dependencies: That
actions/cachestep is a huge time-saver. It keeps yournode_modulesfolder around between runs, so you aren't re-downloading everything from scratch. This can shave minutes off your pipeline execution time. - Running Headless: By default,
npx playwright testruns in headless mode, meaning no actual browser window pops up on the screen. This is crucial for running tests on a server. - Saving Artifacts on Failure: The
if: failure()condition is an absolute lifesaver for debugging. If a test fails, this step automatically saves the entire Playwright report as an artifact. This report includes screenshots, videos, and traces, giving you all the evidence you need to figure out what went wrong.
By integrating your UI tests this way, you're not just finding bugs automatically. You're building a system that also provides your team with the exact information needed to fix them fast, helping you ship a much more stable product.
Common Questions About Automating UI Tests
Whenever a team dives into automating UI tests, the same questions always seem to pop up. It's a natural part of the process. Having a solid plan to tackle these common hurdles is what separates a frustrating, brittle test suite from a reliable automation strategy the whole team can get behind.
One of the first things everyone asks is, "What should we actually automate?" The temptation to automate every single test case is strong, but that's a classic rookie mistake. The smart move is to start with the high-value, repetitive stuff.
What Tests Are Worth Automating
Take a look at your most critical user journeys. I'm talking about the core workflows that would bring everything to a screeching halt if they broke. Those are your prime candidates for automation.
- Core Business Flows: Think about user login, the e-commerce checkout process, or the main search feature. These paths are usually stable and absolutely essential. They have to work, no exceptions.
- Repetitive Sanity Checks: You know those simple, mind-numbing tests someone has to run after every single build? Automate them. This frees up your manual testers to do what they do best: creative, exploratory testing.
- Data-Driven Tests: Any test that involves running the same steps with tons of different data sets is a perfect fit. Filling out a form with 20 different user profiles is a job for a machine, not a person.
The real goal of automating UI tests isn't hitting 100% coverage. It's about getting the biggest bang for your buck—maximum confidence for minimum maintenance. Always prioritize stable tests that directly impact business value.
This infographic breaks down how automated tests plug right into the development pipeline, giving you a bird's-eye view from code commit all the way to the final report.
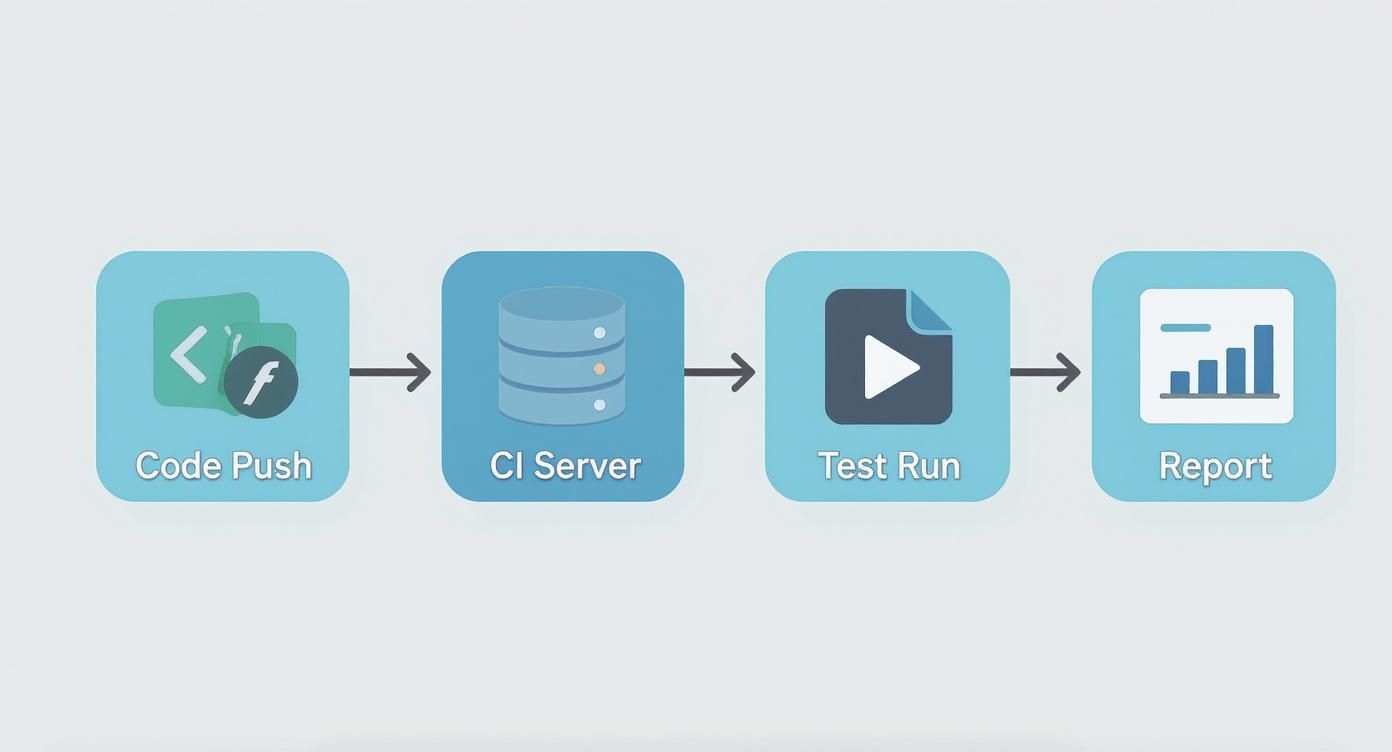
This really drives home the value of CI integration—it’s all about creating that tight feedback loop for developers.
Handling Dynamic Content and Flaky Tests
Another pain point that comes up constantly is dealing with dynamic content and the dreaded flaky tests. How do you test a UI element that loads unpredictably or an animation that doesn’t always finish in 500ms? This is where modern tools like Playwright really shine. They have auto-waits built right in, so they intelligently wait for an element to be ready before trying to click it. This alone wipes out a huge source of test flakiness.
When it comes to test data, the golden rule is to make every test self-contained. Each test should be responsible for creating its own data and, just as importantly, cleaning up after itself. Trust me, relying on a shared, static test database is a fast track to tests that fail for no apparent reason, usually because another test meddled with the data.
Ready to eliminate flaky tests caused by unreliable backends? With dotMock, you can create stable, predictable mock APIs in seconds and take full control of your test environment. See how it works at https://dotmock.com.