API Documentation Template Example Guide
A good API documentation template is more than just a fill-in-the-blanks document; it's a proven, structured framework you can copy and paste to document your endpoints thoroughly. It has to include everything a developer needs to get started fast, covering the overview, authentication methods, endpoint specifics, parameters, request/response examples, and all the possible error codes.
Your Essential API Documentation Template
If you want developers to actually use your API, clear and consistent documentation is non-negotiable. It's often the biggest single factor driving adoption and creating a positive developer experience. Without a solid structure, your docs can easily become a jumbled mess—confusing, incomplete, and a nightmare to keep updated. This is exactly why a standardized template is so critical.
Think of a well-designed template as a pre-flight checklist for your documentation. It guarantees you don't miss any critical details and establishes a predictable format. This helps developers find what they need without friction, which means fewer support tickets and a much faster time-to-first-call. For your internal team, a template standardizes the quality of your documentation and makes the writing process itself far more efficient, especially when multiple people are contributing.
The Foundation of a Great Template
The whole point of API documentation is to answer a developer’s questions before they even think to ask them. Your docs should be a self-service resource that gives users the confidence to start building. To achieve that, a strong template must include a few core elements.
Here’s a quick rundown of the essential components that every solid API documentation template should have. Think of these as the building blocks for creating a resource that developers will genuinely appreciate.
Quick-Reference API Documentation Components
| Component | Purpose | Example |
|---|---|---|
| API Overview | Provides a high-level summary of the API's purpose, key features, and the base URL. | "The User API allows you to create, retrieve, and manage user profiles. Base URL: https://api.example.com/v1" |
| Authentication | Explains how developers can securely authenticate their requests to gain access to the API. | "All requests must include an Authorization header with a Bearer Token: Authorization: Bearer YOUR_API_KEY." |
| Endpoint Definitions | Details each available endpoint, including its function, HTTP method, and the full URL path. | "GET /users/{userId} - Retrieves a specific user's profile." |
| Request & Response | Shows annotated examples of request parameters and the exact structure of success and error responses. | "Request Body: { "email": "[email protected]" } Success Response (200 OK): { "id": 123, "status": "active" }" |
| Status & Error Codes | Lists all possible HTTP status codes and explains their specific meaning within the API's context. | "404 Not Found: The requested userId does not exist." |
This table lays out the fundamental pieces, but remember that the goal is to create a seamless experience. How you present this information is just as important. Publishing it through dedicated platforms like API Documentation Developer Portals can make a huge difference in how developers access and interact with your docs.
Why Structure Matters
When you don't have a set structure, your documentation will inevitably have inconsistencies and gaps. You might find one endpoint has meticulously detailed error codes, while another one has none at all. This kind of inconsistency forces developers to make assumptions, which leads to frustration and a boatload of integration errors. A template solves this by enforcing the same level of detail across your entire API.
By providing a clear and predictable format, a template significantly reduces the cognitive load on developers. They can focus on building their application rather than deciphering your documentation.
Ultimately, this api documentation template example is more than just a document—it's a critical part of your developer relations strategy. It’s a direct reflection of the quality and care you put into your product. Below, you’ll find a ready-to-use template designed to cover all these essential components, giving you a practical starting point for building world-class documentation.
The Anatomy of Great API Documentation
A solid api documentation template example isn't just a list of endpoints; it's a complete guide that walks a developer through every step of using your API. Think of it as a blueprint. Each piece has a specific job, and when they all fit together, developers can build integrations quickly without having to guess their way through. When you understand these core components, you can create documentation that’s not just thorough, but actually helpful.
The impact of getting this right is huge. Good documentation has become a make-or-break factor for developer adoption. In fact, one industry report found that over 80% of developers consider clear, well-structured documentation a major factor when deciding whether to use a new API. It’s often the first real impression someone has of your product, so making it a good one is key. Digging into API documentation best practices shows just how much a great template can smooth out the integration process.
Authentication and Authorization
First things first: how do developers get in? Before they can even think about making a call, they need to know how to authenticate. This section has to be completely unambiguous.
- API Keys: If you use API keys, show developers exactly where to find them and how to pass them along. It's usually in a header like
X-API-KeyorAuthorization. A simple, clear code snippet is non-negotiable here. - OAuth 2.0: For those using OAuth, you need to map out the entire dance. This means clearly stating the authorization URL, the token URL, any required scopes, and the step-by-step process for swapping an authorization code for a usable access token.
Honestly, this is the most important part. If a developer gets stuck here, the rest of your beautiful documentation might as well not exist.
Endpoints and HTTP Methods
Endpoints are the specific URLs developers will hit to get things done. Your documentation needs to list every single one and pair it with the right HTTP method, which tells the server what action to perform.
GET: For fetching data. ThinkGET /users/{userId}to retrieve a specific user.POST: For creating something new. For example,POST /userswould add a new user profile.PUT/PATCH: For updating what's already there.PUTusually replaces the whole thing, whilePATCHis for making partial changes.DELETE: For getting rid of a resource.DELETE /users/{userId}is a straightforward way to delete a user.
Keeping your URL structure logical and consistent—like /resource/identifier—makes the entire API feel more intuitive and predictable.
Parameters and Payloads
Parameters are the knobs and dials a developer can use to tweak a request, while payloads are the actual data being sent back and forth, usually in a JSON body.
A well-documented API clearly distinguishes between different parameter types—path, query, header, and body—and provides realistic examples for each. This precision prevents common integration errors caused by misplaced or malformed data.
For every endpoint, you should show example request and response payloads, with every field explained. What does the field mean? What’s its data type (string, integer, boolean)? Is it required? Providing clear examples for both a successful request and its response sets expectations perfectly.
To round it all out, include a full list of status codes (like 200, 404, 500) and explain what each one means in the context of your API. This gives developers the tools they need to handle successes and failures with confidence.
Illustrating a Successful API Call

Theory is great, but nothing beats a concrete example. Seeing a complete, successful API call in action—what we often call the "happy path"—is arguably the most important part of any API documentation. It gives developers a clear, working model they can copy and build on right away.
This api documentation template example shows a developer precisely what a correct request should look like and what kind of data to expect in return when everything goes right. It cuts through the ambiguity and becomes the go-to reference when they start troubleshooting.
Setting the Scene: The User Profile API
To keep things practical, let's work with a hypothetical "User Profile API." We'll focus on documenting the endpoint for fetching a specific user's data. This is a classic GET request, a scenario that's instantly recognizable and perfect for demonstrating a 200 OK response.
Thinking of APIs as products is no longer a niche idea; it's a global standard. It’s no surprise that 65% of organizations earning revenue from their APIs say this product-centric mindset is key to their success. Good documentation isn't just a manual; it's a core part of the developer experience and the API lifecycle.
Example: GET Request for a User
Here’s exactly how we’d document a request to get the user with an ID of 123. The documentation needs to spell out the method, path, headers, and any parameters.
- HTTP Method:
GET - Endpoint Path:
/users/{userId} - Description: Retrieves the profile information for a single user based on their unique identifier.
Path Parameters
| Parameter | Type | Description | Required |
|---|---|---|---|
userId |
integer | The unique identifier for the user. | Yes |
Headers
| Header | Description | Example |
|---|---|---|
Authorization |
Bearer token for authentication. | Bearer your_api_key_here |
Example Request (cURL)
curl -X GET
'https://api.example.com/v1/users/123'
-H 'Authorization: Bearer your_api_key_here'
The Successful 200 OK Response
After showing the request, you have to show the result. The documentation must include the exact JSON response body a developer should expect. This lets them map the data fields directly to their own application's models.
Response Code:
200 OK
A200 OKstatus means the request was understood, accepted, and processed successfully. The user's data is in the response body.
Response Body (JSON)
{
"id": 123,
"username": "alex_doe",
"email": "[email protected]",
"firstName": "Alex",
"lastName": "Doe",
"isActive": true,
"dateJoined": "2023-10-26T14:00:00Z",
"profile": {
"bio": "Software developer and API enthusiast.",
"avatarUrl": "https://api.example.com/avatars/123.png"
}
}
This complete happy path example is the perfect foundation. To see how this fits into a broader testing strategy, check out our guide on creating an example API test that covers both success and failure cases.
Documenting Common API Error Scenarios
Great API documentation doesn't just show off the "happy path." Let's be real—developers spend most of their time figuring out what went wrong. A well-documented error response is the difference between a frustrating debugging session and a clear path to a solution.
When an API call breaks, the last thing a developer wants is a cryptic response. Providing clear context for what went wrong and how to fix it is a game-changer. This simple step cuts down on support tickets, builds trust, and drastically improves the overall developer experience.
The Anatomy of a Helpful Error Response
A good error message is more than just a status code. It needs to be a structured, predictable object that gives developers actionable information. The best ones almost always include:
- A Unique Error Code: Something machine-readable, like
user_not_found, that lets developers write code to handle specific errors. - A Human-Readable Message: A straightforward description of the problem, like "The user with the specified ID does not exist."
- A Link to Relevant Docs: For more complex issues, a URL pointing to detailed documentation can be a lifesaver.
This approach turns a generic 404 Not Found into a specific, solvable problem. That’s what great API design is all about.
Example Failed Request: A 404 Not Found
Let’s stick with our "User Profile API" and see what happens when someone requests a user that doesn't exist—say, user ID 999. This is your classic 404 Not Found scenario.
Request (cURL)
curl -X GET
'https://api.example.com/v1/users/999'
-H 'Authorization: Bearer your_api_key_here'
Your documentation needs to be crystal clear about the response code and body for this failure.
Response Code:
404 Not Found
A404 Not Foundstatus tells the client that the server couldn't find what was requested. In this case, it means no user exists with theuserIdprovided in the URL.
Error Response Body (JSON)
{
"error": {
"code": "USER_NOT_FOUND",
"message": "A user with the ID '999' could not be found.",
"details": "Please verify the user ID and try the request again."
}
}
This response is instantly useful. The developer knows exactly why the request failed (USER_NOT_FOUND) and gets a direct suggestion on how to fix it. No guesswork required.
Formalizing Errors with OpenAPI
To make your error documentation truly powerful, define these responses right inside your OpenAPI (formerly Swagger) specification. This lets tools automatically generate interactive documentation and even client-side code that understands your API’s failure states.
Here’s a quick YAML snippet showing how to document the 404 response for the GET /users/{userId} endpoint:
paths:
/users/{userId}:
get:
summary: Retrieve a single user
responses:
'200':
description: Successful retrieval of user data.
# ... content definition for success case
'404':
description: User not found.
content:
application/json:
schema:
type: object
properties:
error:
type: object
properties:
code:
type: string
example: "USER_NOT_FOUND"
message:
type: string
example: "A user with the ID '999' could not be found."
By adding this definition, tools like Swagger UI can render this information in a clean, interactive format, giving developers everything they need in one place.
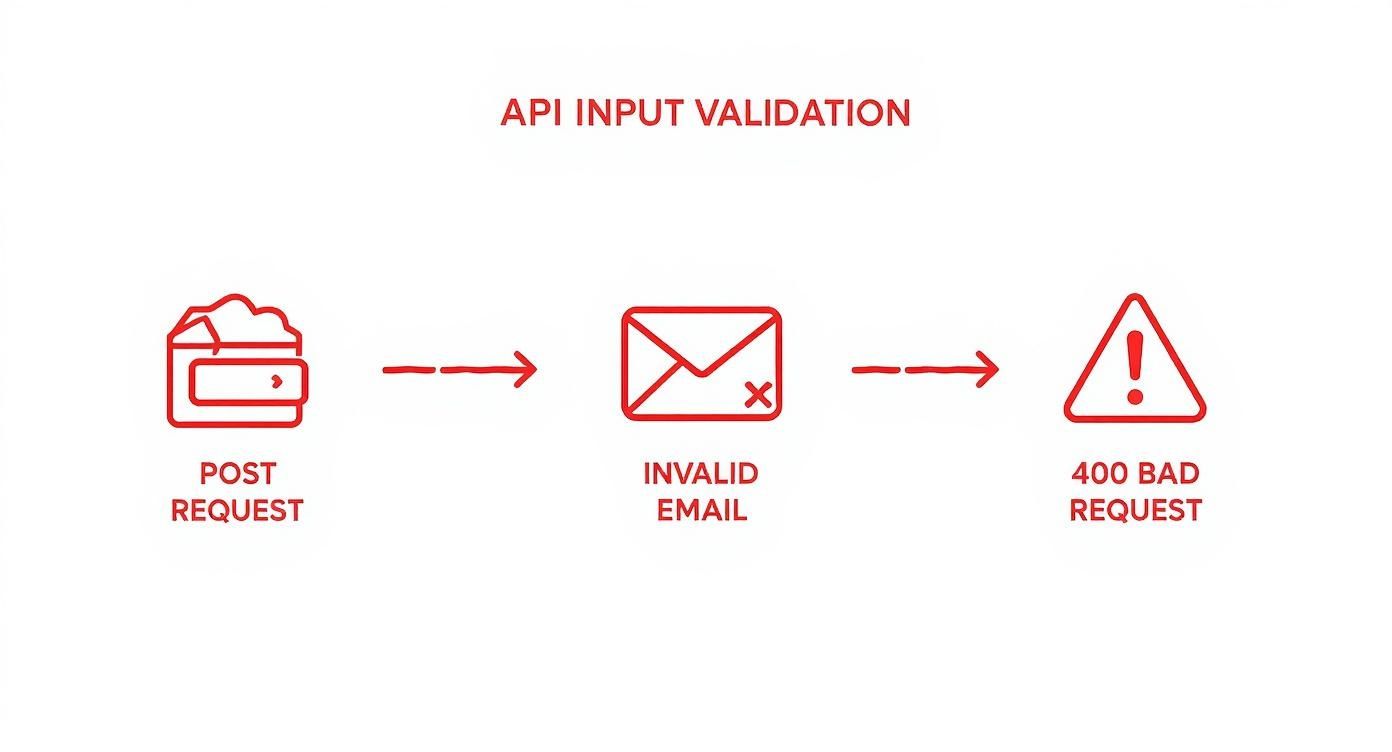
Handling Invalid Input and Edge Cases
A great API doesn't just work well when everything goes right—it fails predictably and gracefully. It’s on us to make sure our documentation prepares developers for those moments, especially when the user’s input is the problem. This part of our api documentation template example shows you how to document these predictable failures, like the classic 400 Bad Request.
Predictable failures aren't bugs; they're the API's way of saying, "You didn't follow the rules." This happens when a required field is missing or a value is sent in the wrong format. Documenting these edge cases is just as critical as showing the "happy path." It helps developers build more robust applications because they can anticipate and handle your API's validation logic from the get-go.
Example: A 400 Bad Request for an Invalid Request
Let's stick with our "User Profile API" but imagine we're creating a new user with a POST request. In this scenario, the developer sends a request to create a user profile but messes up the email address format.
The API should immediately reject this request and return a 400 Bad Request status code. Your job is to show developers exactly what this failure looks like.
Request (cURL)
curl -X POST
'https://api.example.com/v1/users'
-H 'Authorization: Bearer your_api_key_here'
-H 'Content-Type: application/json'
-d '{
"username": "new_user",
"email": "new_user_invalid_email",
"password": "aSecurePassword123"
}'
The response to a bad request shouldn't be a mystery. It needs to be precise, telling the developer exactly which field failed validation and why.
Response Code:
400 Bad Request
A400 Bad Requeststatus means the server couldn't understand or process the request because of an issue on the client's side. This could be anything from a typo in the JSON to sending data that doesn't meet the required format.
Error Response Body (JSON)
{
"error": {
"code": "VALIDATION_ERROR",
"message": "The provided input is invalid.",
"details": [
{
"field": "email",
"issue": "Must be a valid email address format."
}
]
}
}
Defining Validation Rules in OpenAPI
To take this a step further, you can define these validation rules directly in your OpenAPI specification. This is a game-changer. It allows tools to automatically validate requests and even generate smarter client-side code. Using properties like required and pattern makes your API's contracts crystal clear.
Here’s a quick YAML snippet showing how to define the email field with a regular expression for basic validation.
components:
schemas:
NewUserInput:
type: object
properties:
username:
type: string
example: "new_user"
email:
type: string
format: email
pattern: '^[a-zA-Z0-9._%+-]+@[a-zA-Z0-9.-]+.[a-zA-Z]{2,}$'
example: "[email protected]"
password:
type: string
format: password
example: "aSecurePassword123"
required:
- username
- email
- password
With a definition like this, you're not just writing documentation; you're creating a verifiable source of truth that machines can understand and enforce.
Automating Documentation With OpenAPI and Swagger
If you're still creating API documentation in a static document, it's time to make a change. The modern approach revolves around a machine-readable format, and that’s where the OpenAPI Specification (formerly Swagger) really shines. It transforms your documentation from a simple guide into a single source of truth that drives the entire development lifecycle.
Think of it this way: a specification-driven approach means your documentation is no longer just a passive reference. It becomes an active blueprint. From this single file, you can automatically generate interactive API consoles, client SDKs in multiple languages, and even server stubs. This keeps your code and documentation perfectly in sync, which dramatically cuts down on manual errors and the all-too-common problem of outdated info.
Bridging Manual Docs and Automated Specs
The way we document APIs has come a long way, especially with collaborative tools. For instance, developers have shared over 46 million Postman collections, which often serve as informal documentation templates. But even with these tools, a recent API marketing report found that 55% of organizations are still fighting with inconsistent or outdated docs. This is precisely the gap OpenAPI was designed to fill.
When you define validation rules right in your OpenAPI spec, you're not just documenting them—you're making them enforceable. The API can automatically reject a request with bad data, as shown below.
This practice ensures that every developer who uses your API gets a consistent, predictable experience with error handling. No more guessing games.
From Specification to Mock API
One of the most practical advantages of adopting OpenAPI is the ability to spin up a functional mock environment in seconds. Once your specification file is ready, you can generate a realistic, interactive simulation of your API without writing a single line of backend code. This is a game-changer because it lets your frontend and backend teams work in parallel instead of waiting on each other.
By clearly defining endpoints, parameters, and responses in a structured YAML or JSON file, you're creating a contract. Development tools can read this contract and act on it, effectively turning your documentation into an executable asset.
Tools like dotMock make this transition incredibly smooth. You can take your finished OpenAPI file and generate a mock server that behaves exactly as described in your docs—including success responses, errors, and tricky edge cases. To see how it works, check out our guide on how to import an OpenAPI specification into dotMock. This capability makes robust testing possible from day one and accelerates development, proving that a solid specification is the cornerstone of any efficient API strategy.
Best Practices for Documentation Maintenance
Nailing your api documentation template example is a great start, but the real work begins after you publish it. The biggest challenge is keeping your docs accurate as your API evolves over time. Think of your documentation as a living, breathing part of your product—not a "set it and forget it" task.
When the documentation no longer matches the API's actual behavior, developers lose trust fast. This gap, often called documentation drift, leads to wasted hours and pure frustration during integration. The key to avoiding it is simple in theory but requires discipline in practice.
The best approach I've seen is to treat your documentation just like you treat your code. This means any update to the documentation should be part of the same development workflow as the code change itself. When a developer modifies an endpoint, they should be updating the docs in the very same pull request.
Integrate Documentation Into Your CI/CD Pipeline
Automation is your best weapon against documentation drift. By building documentation checks right into your continuous integration and continuous delivery (CI/CD) pipeline, you can guarantee that no code ships without its corresponding docs.
This simple shift creates a culture where documentation isn't an afterthought—it's a core part of delivering a feature. It also adds another layer of review, helping your team spot inconsistencies long before they ever get to your users.
- Linting Specs: Set up automated checks to scan OpenAPI or Swagger files for syntax errors and missing required fields.
- Automated Generation: Use tools that can generate documentation stubs directly from your code comments or API specification files.
- Deployment Gates: Configure your pipeline to fail a build or block a deployment if documentation changes aren't included with a code update.
Establish Clear Versioning and Communication
Your API is going to change. That’s a given. Your documentation has to keep pace, and a rock-solid versioning strategy is the only way to manage these changes without creating chaos for developers on older versions.
A straightforward and popular method is to put the version number right in the URL path, like /api/v2/users. This makes it incredibly clear which version is being used and allows documentation for different versions to exist side-by-side.
A new API version must always be accompanied by a new, corresponding version of your documentation. Always. Make sure you archive the old docs so developers can reference them for legacy systems while you provide a clear migration path to the new version.
On top of that, keep a public changelog. It should detail every single update, from tiny bug fixes to major, breaking changes. This level of transparency is how you build trust and help developers schedule their work around your API's roadmap. If you want to go deeper on this, you can find more on structuring your docs in this guide to API documentation best practices.
Common Questions About API Documentation
As you start putting your API documentation together, you'll inevitably run into some common questions. Getting these details right is what separates a decent document from a truly helpful one that developers will love using. Let's tackle some of the most frequent ones.
A quick pro-tip: to make your FAQ more visible on Google, it’s worth taking the time to implement FAQ schema for rich snippets. This helps your answers show up directly in search results, giving developers instant help.
OpenAPI Versus Swagger: What Is the Difference?
This one trips a lot of people up, but it's actually pretty simple. Think of it like this: Swagger was the original name for the API specification. Back in 2015, the project was moved to the Linux Foundation and got a new name: the OpenAPI Specification.
Today, OpenAPI is the specification itself—the rulebook that defines your API. Swagger refers to the family of popular tools that help you work with that specification, like Swagger UI and Swagger Editor. In short, you use Swagger tools to create an OpenAPI specification.
How Should I Document API Rate Limits?
Nothing frustrates a developer more than hitting an unexpected 429 Too Many Requests error. Clear documentation on rate limits is non-negotiable for managing expectations and helping developers build stable applications.
Be explicit about a few key things:
- The Limit: How many requests can be made in a specific timeframe? (e.g., 1,000 requests per hour).
- The Scope: Is the limit per API key, per user account, or per IP address? This detail matters a lot.
- The Response Headers: Show developers exactly how to check their current status. Point out the headers like
X-RateLimit-Limit,X-RateLimit-Remaining, andX-RateLimit-Resetand explain what each one means.
Including a sample response with these headers in action is the best way to make this crystal clear.
What Are the Best Tools for Hosting API Documentation?
The right tool really boils down to your team's existing workflow and specific needs. For most, static site generators are the way to go because they're fast, secure, and play nicely with version control systems like Git.
If you look at the documentation for industry leaders like Stripe or Twilio, you'll see they often use custom or open-source static site generators. This gives them complete control over the look, feel, and overall developer experience.
Here are a few popular choices:
- Docusaurus: An excellent modern static site generator from Meta, perfect for documentation that has a lot of content.
- ReadMe: A commercial product that goes beyond just hosting by tying your documentation directly to API metrics.
- Swagger UI: The classic choice for quickly generating interactive documentation straight from an OpenAPI file.
How Can I Make My API Documentation More Interactive?
Interaction is the key to turning a passive reading experience into an active learning one. The single most effective way to do this is to embed an API console right on the page.
When a developer can make a live API call without ever leaving your documentation, they can learn and build much faster. Most modern tools can render an interactive console directly from your OpenAPI file. This lets users plug in their own API keys, tweak parameters, and see real responses in real-time. It's the fastest way to get them to that "aha!" moment, which is a huge win for developer onboarding.
Ready to stop waiting on backend teams and start building? With dotMock, you can generate reliable, production-ready mock APIs from OpenAPI specs, live traffic, or simple descriptions in seconds. Test every edge case and ship faster. Get started with dotMock for free.